Spend any time watching recording studio tours on YouTube and you will spot one eventually: a small, padded room tucked inside the main studio, lined with acoustic foam, housing nothing but a microphone stand and a pop filter. That is a vocal booth - and the moment you see one, a reasonable question follows: do I need one of those?
The honest answer is: probably not, but it depends on what you are trying to do. And the reasoning behind that answer is worth understanding, because most of the advice out there either oversells the booth or ignores it entirely. This guide gives you a clear, impartial framework for deciding whether a vocal booth belongs in your setup - or whether your budget is better directed elsewhere.
What a Vocal Booth Actually Does
A vocal booth is a small, acoustically treated and often soundproofed enclosure designed to isolate a singer or voice artist during recording. It blocks external noise from bleeding into your take and reduces internal sound reflections, giving you a cleaner vocal track that is easier to work with in post-production.
Vocal booths appear in professional recording studios, home studios, podcast suites, and voice-over production spaces. They range from purpose-built room-within-a-room constructions to portable folding structures you can assemble on a desk. For a broader picture of how different studios approach acoustic design, Types of Recording Studios Explained - Music Studio Finder is a useful starting point.
Two Functions People Constantly Confuse
A vocal booth does two distinct things - and mixing them up leads to bad purchasing decisions.
Sound isolation means preventing sound from crossing a physical boundary: stopping traffic noise from reaching the microphone, or stopping your singing from carrying through a wall to your neighbour. Isolation depends on mass (dense, heavy materials that resist sound transmission), decoupling (floating walls or floors that break vibration paths), and air gaps between structural layers. The standard measurement is the STC (Sound Transmission Class) rating - the higher the number, the more decibels blocked. A standard stud wall scores around STC 33-35. A properly built floating room-within-a-room can reach STC 60+.
Acoustic treatment is something else entirely. It controls what happens to sound inside the space - reducing flutter echo (the rapid ping-pong reflection between parallel walls), taming standing waves (fixed resonant frequencies that build up at specific points in a room), and shortening the reverb tail so the microphone captures your voice rather than your room. Treatment materials include acoustic foam, mineral wool panels, bass traps, and diffusers. Performance is rated using the NRC (Noise Reduction Coefficient), a value between 0 and 1 where 1 represents total absorption.
A great vocal booth does both. A mediocre one often does neither particularly well.
What Is a VO Booth?
A VO booth - short for voice-over booth - is a close relative of the vocal booth but with a different acoustic character. Where a singer's booth might preserve a small amount of natural room ambience, a VO booth is deliberately "dead": highly absorbent, with a very short reverb tail and minimal colouration. That dry sound is what audiobook publishers, advertising agencies, and animation studios require, because any detectable room character in a narration recording is nearly impossible to remove cleanly in post-production.
Voice actors, audiobook narrators, e-learning narrators, and podcasters typically work in VO booths. They are often smaller than a singer's booth - sometimes just large enough for one person and a microphone - because the priority is isolation and dryness, not any sense of space.
The Acoustic Science, Without the Jargon
Sound is pressure waves moving through air and solid materials. When those waves hit a wall, three things happen at once: some energy passes through (transmission), some is absorbed and converted to heat (absorption), and some bounces back into the room (reflection).
A well-designed vocal booth addresses all three. The outer walls use mass and decoupling to resist transmission - this is where mass-loaded vinyl (MLV) and dense concrete blocks do their work. The inner surfaces use absorption panels and bass traps to convert reflections into heat. Some booths add diffusers to scatter mid-to-high frequency reflections rather than absorbing them completely, which prevents the unnervingly dead character that comes from overdoing absorption.
One persistent myth worth clearing up early: a perfectly silent, reflection-free room does not automatically produce the best recordings. Singers often struggle to pitch in an extremely dead acoustic environment because they lose the natural feedback from the room they rely on during live performance. The goal is a controlled acoustic environment, not a sensory deprivation chamber.
Soundproofing vs. Acoustic Treatment - What's the Difference? Soundproofing (isolation) stops sound from crossing boundaries. Acoustic treatment controls what sound does once it's inside a space. You need both for a functional vocal isolation booth, but they require different materials and techniques. Acoustic foam tiles - the most commonly purchased home studio product - provide treatment but offer almost no isolation whatsoever.
Do You Actually Need a Vocal Booth?
Let me be direct: most home recording musicians, podcasters, and occasional voice-over artists do not need a dedicated vocal booth. Most need a better treated room, a more appropriate microphone for their environment, and some basic knowledge of mic placement. That said, there are clear scenarios where a booth is the right call.
When a Vocal Booth Is Worth It
- You record in a genuinely noisy environment: a terraced house with neighbours, a flat above a busy road, or a home with children and pets creating unpredictable background noise.
- You work as a professional voice-over artist or audiobook narrator and your clients require pristine, low-noise-floor recordings with strict technical specifications.
- You track live band sessions at home and need to prevent bleed between a vocalist and other instruments recording simultaneously.
- You record frequently enough - say, multiple sessions per week - that the infrastructure cost pays for itself in saved studio hire over 12-18 months.
- You have a space large enough to house a booth comfortably. Attempting to build a booth in a room where it occupies 80% of the floor area creates new acoustic problems rather than solving existing ones.
When You Probably Don't Need One
- You use a dynamic microphone. The Shure SM7B and SM58 are significantly less sensitive to room reflections and background noise than large-diaphragm condenser microphones. In a reasonably treated room, a dynamic mic can produce excellent results with no booth at all.
- You record occasional tracks - demos, reference recordings, or podcast episodes where slight room character is acceptable or even desirable.
- Your recording budget is limited. Spending £500 building a mediocre DIY booth when that money could buy a quality condenser microphone and a Focusrite Scarlett audio interface is a poor trade. Gear quality feeds directly into the recording chain; a sub-par booth often does more harm than good.
- You have access to a professional studio for your key sessions. If you only record final vocals two or three times a year for release-quality tracks, booking studio time almost always produces a better result at a lower total cost than constructing a booth.
The Right Questions to Ask Before You Decide
Work through this before committing to any booth solution:
- Recording environment: How noisy is your space? Is the noise a constant problem or occasional and manageable?
- Microphone type: Are you using a condenser (more room-sensitive) or a dynamic (more forgiving)?
- Recording purpose: Demos and reference recordings have different tolerances than commercial release or professional VO work.
- Budget: What can you realistically spend - on the booth itself and on the time to build or set it up?
- Recording frequency: How often do you record? Weekly or more justifies the investment; monthly or less probably doesn't.
- Available space: Do you have a room large enough to house a booth without the booth itself becoming an acoustic problem?
Vocal Booth vs. Alternatives - A Practical Comparison
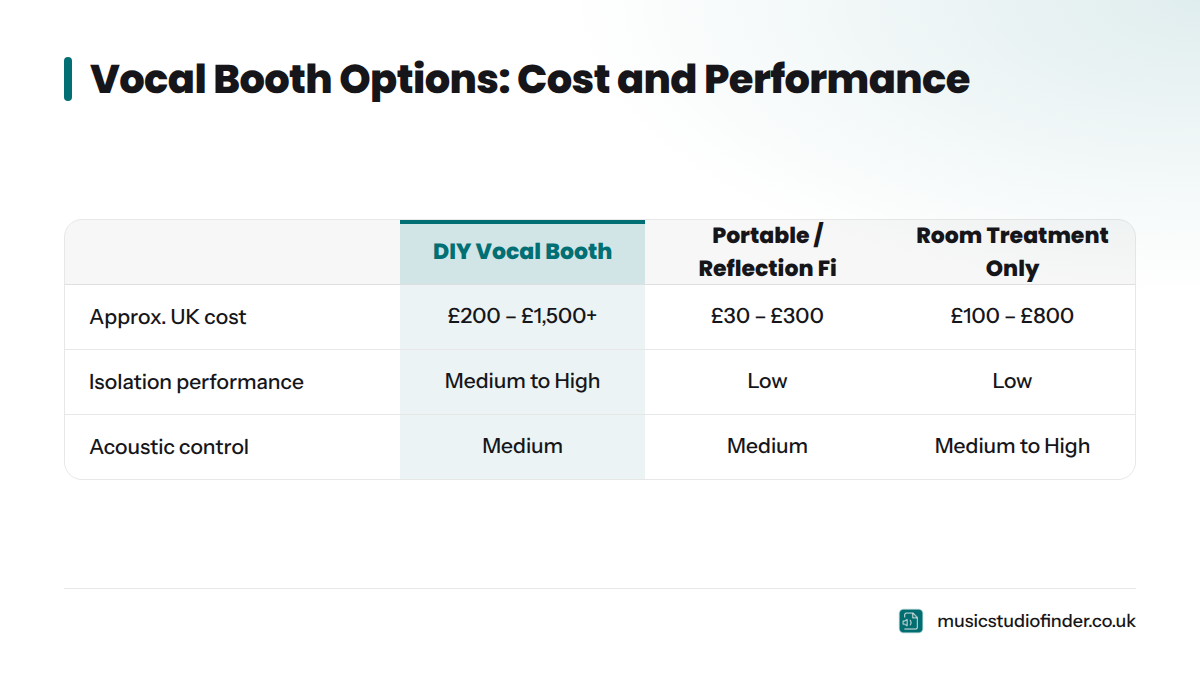
Here is a concrete comparison of the four main approaches to controlling vocal recording acoustics, with real UK cost ranges.
| Option | Approx. Cost (GBP) | Isolation Performance | Acoustic Control | Best Suited For |
|---|---|---|---|---|
| DIY Vocal Booth | £200 - £1,500+ | Medium to High | Medium | Regular home recorders with dedicated space |
| Portable Booth / Reflection Filter | £30 - £300 | Low | Medium | Budget home setups and quick recordings |
| Acoustic Room Treatment (no booth) | £100 - £800 | Low | Medium to High | Home studios with a decent, quiet room |
| Professional Recording Studio | £20 - £80/hr (UK avg) | Very High | Very High | Release-quality vocals and one-off sessions |
According to the Recording Studio Cost UK: 2026 Pricing Guide - Music Studio Finder, hourly studio rates across the UK range from around £20 for budget project studios to £80 or more per hour for premium facilities. That puts a full day of vocal recording at a professional studio well within the cost of a decent DIY booth build - with zero construction effort required.
Reflection Filters - A Budget-Friendly Starting Point
A reflection filter is a curved, multi-layer absorption panel that mounts directly to your microphone stand and wraps around the back of the microphone. It reduces the reflections arriving at the rear and sides of the capsule from the surrounding room, making your recording sound more direct and less roomy.
The SE Electronics Reflexion Filter is the industry-standard product in this category - widely used in home studios and frequently recommended by audio engineers as a starting point before committing to a full booth build. The Kaotica Eyeball takes a different approach, enclosing the microphone capsule itself in a foam sphere.
The critical limitation: reflection filters do nothing for external noise. If a bus rolls past your window mid-take, the filter won't help. These products treat the microphone's immediate acoustic environment, not the room's isolation from the outside world.
DIY Vocal Booth Alternatives for Home Recordists
You don't need a construction crew to meaningfully improve your recording environment. Here are practical options ranked by effort and cost.
- The wardrobe trick: A clothes-filled wardrobe is an underrated recording space. The hanging garments absorb high-frequency reflections, and the enclosed space reduces ambient noise pickup. Hang a microphone stand inside, position your condenser at head height, and you have a functional low-budget vocal enclosure. Works particularly well for voice-over and podcast recordings.
- Moving blankets: Hang heavy moving blankets around a corner of the room, creating a three-sided enclosure. Moving blankets carry a reasonable NRC rating for their cost (typically £10-£30 each) and can be taken down and stored when not recording.
- The duvet tent: Sitting under a thick duvet with your microphone and laptop is genuinely effective for podcasting and voice-over work. Absurd-looking, but the acoustic result surprises many first-time home recordists.
- PVC pipe frame with acoustic blankets: Build a lightweight rectangular frame from 25mm PVC conduit (available from any UK plumbing merchant), cover it with mass-loaded vinyl on the outside and acoustic foam or blankets on the inside. Total material cost runs approximately £80-£200 depending on size and material choices.
Quick DIY Vocal Booth - What You Need
- PVC conduit (25mm or 32mm) and corner joints
- Mass-loaded vinyl (MLV) sheeting for isolation
- Acoustic foam panels or moving blankets for absorption
- Cable ties or bungee cords for fixing materials to the frame
- A spirit level and tape measure
- Approximate total cost: £80-£250
When to Skip the Booth and Book a Studio
There are moments when neither a DIY booth nor a reflection filter is the right answer. If your recording is destined for commercial release, a soundtrack placement, or a professional broadcast submission, a purpose-built professional recording studio will simply outperform anything achievable in most homes.
Professional studios offer engineered vocal booths with STC ratings of 50-70, calibrated monitoring, experienced engineers, and the kind of acoustic consistency that makes mixing and mastering far less painful. What Happens in a Professional Recording Session - Music Studio Finder explains the full workflow and is worth reading before you decide whether to build or book.
Situations where booking beats building:
- You need release-quality recordings but only track finished vocals two or three times a year
- You want a professional engineer alongside you during the session
- Your home space is genuinely unsuitable for treatment - open-plan flat, very small room, rented accommodation where you can't fix anything to walls
- The one-off cost of studio hire is lower than the build cost of a booth that would meet your quality threshold
The Recording Studio vs Home Studio - Music Studio Finder breakdown covers this decision in depth and is worth reading alongside this guide.
How Much Does a Vocal Booth Cost in the UK?
DIY Vocal Booth Cost Breakdown
| Material | Approximate UK Cost |
|---|---|
| Timber frame (2x4 studwork, 8 lengths) | £40 - £80 |
| Mineral wool insulation (e.g. Rockwool RW3) | £50 - £120 |
| Mass-loaded vinyl (MLV), 5m² | £60 - £100 |
| Acoustic foam panels (20 tiles) | £30 - £80 |
| OSB or drywall for outer cladding | £40 - £90 |
| Door seals and acoustic door threshold | £20 - £60 |
| Fixings, adhesive, miscellaneous | £20 - £40 |
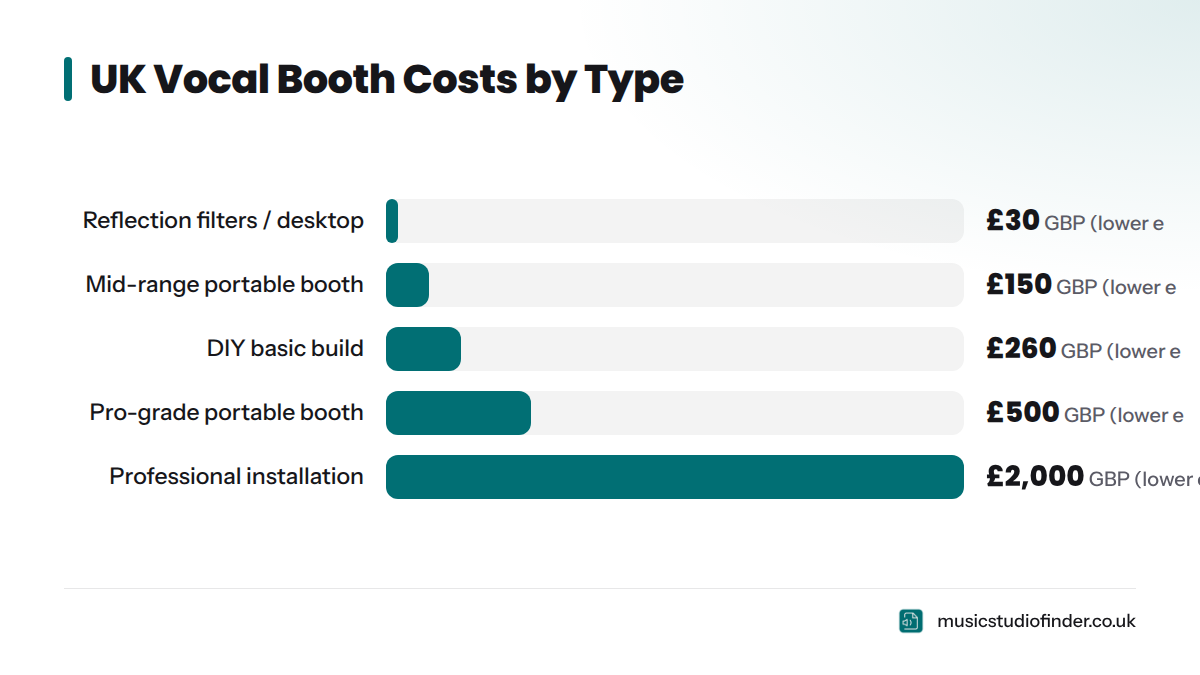
| Total (basic build) | £260 - £570 |
| Total (higher-spec build with better isolation) | £800 - £1,500+ |
Plan for one to three full weekends for a basic corner booth build, assuming average DIY competence. Basic carpentry, measuring, and cutting are all you need - no specialist knowledge, though patience is non-negotiable.
Pre-Built and Portable Vocal Booth Options
- Entry-level reflection filters and desktop enclosures: £30 - £150. The SE Electronics Reflexion Filter Pro sits at the upper end of this range and is well-regarded for treating microphone acoustics on a tight budget.
- Mid-range portable vocal booths: £150 - £500. VocalBoothToGo sells modular, tool-free portable booths in this range that fold away for storage - a practical option for home studios in rented accommodation.
- Professional-grade portable isolation booths: £500 - £2,000+. These are larger, heavier structures offering meaningful isolation alongside acoustic treatment, suited to dedicated home studio rooms.
Professional Vocal Booth Installation
A bespoke, professionally installed vocal booth - a true room-within-a-room with floating floor, decoupled walls, and engineered HVAC - typically costs between £2,000 and £10,000+ in the UK depending on size, specification, and whether structural work is required. For most home recordists, this is not a realistic option. For professional studios, broadcast facilities, and serious voice-over production houses, it is standard infrastructure.
How to Build a Basic Vocal Booth at Home
If you have worked through the decision framework and concluded that a DIY booth is the right call, here is a straightforward process for building a corner booth - the most space-efficient option for a typical UK spare bedroom or home studio.
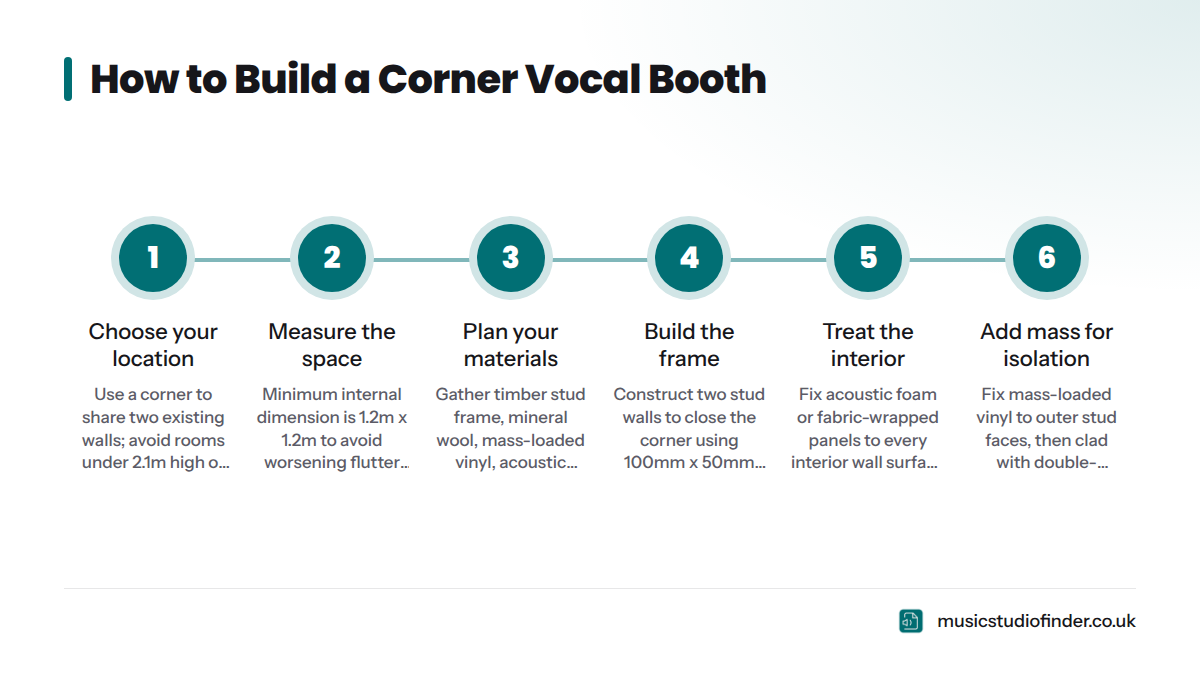
- Choose your location. A corner of a room gives you two existing walls to work with, reducing the amount of new structure you need to build. Avoid rooms with very low ceilings (under 2.1m) or rooms that share a wall with a neighbour's bedroom.
- Measure the space. A workable minimum internal dimension is 1.2m x 1.2m. Smaller than this and flutter echo between parallel walls can become worse inside the booth than outside it.
- Plan your materials. At minimum: a timber stud frame, mineral wool or Rockwool insulation between studs, a layer of mass-loaded vinyl on the outer face of the frame, and acoustic foam or fabric-wrapped panels on the interior surfaces. Add a bass trap in each interior corner.
- Build the frame. Construct two new stud walls to close off the corner, leaving a door opening in one. Use 100mm x 50mm timber for the studs for better mass and insulation depth.
- Treat the interior. Fix acoustic foam panels or fabric-wrapped mineral wool panels to every interior wall surface - and cover the ceiling too. This is one of the most commonly skipped steps and one of the most acoustically important.
- Add mass for isolation. Fix mass-loaded vinyl to the outer face of your stud walls before cladding with OSB or drywall. Double-layering drywall with a thin layer of acoustic sealant between the sheets (the "constrained layer damping" technique) improves low-frequency isolation noticeably.
- Test and adjust. Record a vocal take inside the finished booth and listen critically on headphones. Persistent flutter echo points to parallel reflective surfaces that need more absorption. Audible external bleed points to isolation gaps - check door seals and any gaps around cable runs.
Common Mistakes When Building a DIY Vocal Booth
- Building it too small: A booth smaller than 1.2m x 1.2m internally can worsen flutter echo and make parallel-wall resonance more pronounced than in an untreated room.
- Confusing acoustic foam with soundproofing: Foam tiles absorb high-frequency reflections - they do not block sound from entering or leaving. This is one of the most widespread misconceptions in home recording.
- Forgetting ventilation: A sealed booth heats up quickly under studio lighting and body heat. Plan for at least a passive vent lined with acoustic baffles, or a quiet inline fan system.
- Leaving the floor and ceiling untreated: Both surfaces contribute significantly to the booth's acoustic character. A hard floor reflects sound directly into the microphone; a bare ceiling creates comb filtering with floor reflections.
Equipment You Need for Recording Vocals at Home
The right gear shapes what your recording environment needs to do. Here is the core kit, with notes on how each piece interacts with your acoustic setup.
- Microphone: The single most consequential decision for home recording acoustics. A large-diaphragm condenser microphone - such as the Rode NT1 or AKG C214 - captures extraordinary detail, including every room reflection and background noise. Use one in a treated space or a booth. A dynamic microphone like the Shure SM7B or SM58 has a tighter polar pattern and lower sensitivity to off-axis noise, making it far more forgiving in untreated rooms.
- Audio interface: Converts your microphone's analogue signal to digital. The Focusrite Scarlett series is the standard recommendation for home studio vocal recording setups at every price point - clean preamps, reliable drivers, and phantom power for condenser microphones.
- Pop filter: Reduces plosive sounds (the hard "P" and "B" consonants that overload microphone capsules). Non-negotiable for vocal recording. Cost: £5-£30.
- Microphone stand: A boom stand with a solid base prevents floor vibrations from reaching the capsule. Avoid plastic stands - they introduce mechanical resonance into the signal chain.
- DAW (Digital Audio Workstation): Your recording and editing software. Logic Pro (Mac), Ableton Live, Reaper, and GarageBand are all widely used. Reaper offers a full-featured trial and a modest licence fee, making it popular for home studios on a budget.
- Studio headphones: Closed-back headphones - such as the Beyerdynamic DT 770 Pro or Sony MDR-7506 - let you monitor your recording without bleed from the headphone output reaching the microphone.
Before your first session - at home or in a professional studio - the Studio Session Prep Checklist for Musicians - Music Studio Finder covers everything you need to have ready.
Frequently Asked Questions
At minimum: a microphone (condenser or dynamic depending on your room's acoustic quality), an audio interface with phantom power, a pop filter, a boom microphone stand, studio headphones, and a DAW. If your room is acoustically untreated, add a reflection filter or hang moving blankets behind the recording position to reduce reflections.
A VO booth - voice-over booth - is a highly sound-isolated, acoustically dead recording enclosure used by voice actors, narrators, podcasters, and audiobook readers. It differs from a singer's vocal booth in that it prioritises maximum dryness (very short reverb tail, minimal ambience) over any natural room sound, since narration recordings must be free of any detectable room character.
A basic DIY corner booth using timber studwork, Rockwool insulation, mass-loaded vinyl, and acoustic foam panels costs approximately £260-£570 in materials. A higher-specification build with better isolation materials and a proper acoustic door can reach £800-£1,500. Professionally installed room-within-a-room booths start at around £2,000 and can exceed £10,000 for large, broadcast-specification builds.
The process follows the same seven steps outlined above, but with a stronger emphasis on interior acoustic absorption and less concern about preserving any natural ambience. Use a higher density of acoustic foam or fabric-wrapped mineral wool panels on all six surfaces (four walls, floor, ceiling). Keep the interior small - a 1.2m x 1.2m footprint is sufficient for a solo narrator - and prioritise door seals and cable-entry acoustic baffles to close off noise leakage paths.
Yes - many commercially released records were tracked in treated rooms with no booth at all. The key variables are the room's background noise level, the acoustic treatment present, and the microphone choice. A dynamic microphone in a well-treated bedroom can produce excellent results. A condenser microphone in an untreated room will capture reflections and background noise that are genuinely difficult to remove in mixing. The How to Choose a Recording Studio - Music Studio Finder guide is worth reading if you are evaluating whether your home setup meets the threshold for the recordings you want to make.
A vocal booth is a physical room or enclosure that provides both sound isolation (blocking external noise) and acoustic treatment (controlling internal reflections). A reflection filter is a small, portable panel that mounts to a microphone stand and reduces rear and side reflections at the microphone capsule. A reflection filter costs far less and requires no construction, but it provides no isolation from external noise. Think of it as treating the microphone's immediate acoustic environment rather than the room itself.
For most podcasters, no. A dynamic microphone, a treated recording corner (wardrobe, blanket enclosure, or foam-panelled wall), and a quiet recording window will produce podcast-quality audio that listeners are perfectly happy with. Dedicated VO booths are worth considering for shows with large audiences, advertisers with strict audio specifications, or podcasters who also work as voice-over artists and need broadcast-grade recordings.
If you record release-quality vocals fewer than once a month, booking a professional recording studio almost always makes more financial sense than building a booth. Studio hire at £20-£80 per hour gives you access to a properly engineered acoustic space, professional monitoring, and often an experienced engineer - for a fraction of the cost of a high-quality DIY build. Use Music Studio Finder to search for vocal recording studios near you across the UK.
What's Right for You - A Budget-by-Budget Verdict
Here is how I would frame the decision by budget and use case.
Under £200 to spend on your recording setup: Skip the booth entirely. Put the budget toward a better microphone and a quality audio interface. Add a reflection filter if you want to reduce room character at the capsule. Record at quiet times of day and choose a treated corner of your room.
£200-£800 and recording regularly at home: A DIY corner booth built with Rockwool insulation and mass-loaded vinyl is achievable and genuinely improves your home studio vocal recording environment. Follow the seven steps above, avoid the common mistakes, and you will have a functional space. Check the Recording Studio Cost UK: 2026 Pricing Guide - Music Studio Finder first to confirm the numbers work in your favour versus studio hire.
Release-quality vocals, one-off sessions, or professional VO work: Book a professional studio. The acoustic engineering, monitoring quality, and professional environment are simply better than what most home booth builds can replicate. Search Music Studio Finder to find a recording studio near you, or browse vocal sessions in London if you are based in the capital.
Serious home studio investment (£1,500+): A high-specification DIY or professionally installed booth becomes viable at this budget. Pair it with proper room treatment in the control room and calibrated monitoring for a genuinely professional home recording environment.
Whatever path you choose, the How to Find a Recording Studio Near You - Music Studio Finder guide is worth bookmarking. Even the best home booth has a ceiling, and knowing when to step into a professional space is one of the most underrated skills in independent music production.
Sources
- Audio Engineering Society (AES)
- Acoustical Society of America - Science of Sound
- SE Electronics - Reflexion Filter Product Range
- VocalBoothToGo - Portable Vocal Booths
- Sound On Sound - Home Studio Acoustic Treatment
- Shure - SM7B and SM58 Microphone Specifications
- Focusrite - Scarlett Audio Interface Range
- Music Studio Finder - Recording Studio Cost UK: 2026 Pricing Guide
- Music Studio Finder - Recording Studio vs Home Studio
- Music Studio Finder - Types of Recording Studios Explained