
Your first professional recording session can feel like stepping into someone else's world. You're paying by the hour, there are unfamiliar people in the room, and the equipment looks like it belongs in an aircraft cockpit. That anxiety is normal - and it almost always dissolves within the first thirty minutes once you understand what each person is actually doing and why.
This guide walks through every stage of the recording studio process, from the moment you arrive to the moment your finished files land in your inbox. Read it the night before and you'll walk through that studio door feeling prepared.
For a broader grounding in how studios operate, understanding recording studios is a good starting point before you go any further.
What a Professional Recording Session Actually Covers
A professional recording session is any structured, engineer-assisted period of work carried out in an acoustically treated studio with the purpose of capturing, editing, or processing audio. The term covers several distinct types of work, and knowing which type you're booking shapes how you prepare.
The main session types:
- Tracking session - the initial capture of live performances (drums, bass, guitars, vocals) into a DAW (Digital Audio Workstation) such as Pro Tools or Logic Pro.
- Overdub session - additional layers recorded on top of an existing tracked foundation (extra guitar parts, harmonies, strings, keys).
- Comping session - the engineer assembles the strongest moments from multiple takes into one definitive performance. This often happens inside the tracking session; on larger projects it gets its own dedicated time.
- Mixing session - all recorded tracks are balanced, processed with EQ, compression, and effects, and blended into a stereo or surround master.
- Mastering session - the final stereo mix is treated for loudness, tonal balance, and format-specific delivery (streaming, vinyl, CD).
Most independent UK musicians book a tracking session first, then return for mixing. Mastering is often handled by a specialist mastering engineer, sometimes at a different facility altogether.
Quick Glossary
- Tracking: Recording a live performance into the DAW.
- Overdubbing: Recording new parts over an existing recorded bed.
- Comping: Editing the best sections from multiple takes into one complete performance.
- Mixing: Balancing and processing all tracks into a cohesive stereo output.
- Mastering: Preparing the final mix for commercial release at the correct loudness standard (typically -14 LUFS for streaming platforms).
Who's in the Room - and What They Need From You
Walk into any professional studio and you'll find between two and six people. Knowing what each person does makes communication far easier.
The Audio Engineer
The audio engineer is the technical operator of the session. They place microphones, route the signal chain (microphone to preamp to analog-to-digital converter to DAW), manage gain staging, run the recording software, and monitor everything through the studio's near-field monitors. During tracking, their focus is capturing the cleanest possible signal. Think of them as the translator between the musical idea in your head and the audio file on the hard drive.
Not every studio includes an engineer in the room rate - it's worth checking whether recording studios provide an audio engineer before you book.
The Record Producer
The producer is the creative director. Where the engineer asks "did we capture that cleanly?", the producer asks "was that the right performance?" A producer may reshape the arrangement, suggest a tempo change, call for another take because the energy was wrong, or coach a vocalist through an emotionally demanding section. On smaller indie sessions, one person often holds both roles - engineer-producer. On larger projects, these are distinct jobs with separate fees.
Engineer vs. producer - the one-line version: The engineer controls how it sounds technically; the producer controls whether it sounds right creatively. You can book a recording studio without a producer if you're confident directing your own session, which many independent artists do.
The Artist or Band
Your job during a session is to perform, listen, and communicate. You're not expected to understand the desk or the DAW. You are expected to know your parts, respond to direction, and tell the engineer when something in your headphone mix isn't working for you.
Session Musicians (When Applicable)
If your project requires instrumentation beyond what the band provides - a string quartet, a live drummer, a session saxophonist - those musicians are booked in advance and paid a separate fee. The Music Producers Guild UK publishes guidelines on session musician rates and professional conduct that are worth reviewing if this applies to your project.
Before the Session Starts - Pre-Production and Preparation
Pre-production is every decision you make before the recording light turns red. It's the single biggest factor separating a session that runs on time and sounds great from one that burns money and ends in frustration.
Why Preparation Determines the Quality of Your Recording
Recording time is expensive. Every minute you spend in the studio figuring out a chord progression or debating song structure is a minute you could have spent getting a better take. Professional engineers consistently observe that the artists who arrive most prepared leave with the best recordings - not because they're more talented, but because they use studio time to perform, not rehearse.
Pre-production means finalising your arrangements, running a demo (even a phone voice memo works), agreeing on a click track tempo for every song, and knowing exactly which songs you're recording and in what order.
What to Have Ready Before You Arrive
Use this checklist the night before your session:
Pre-Session Preparation Checklist:
- Know every part of every song - no learning in the studio
- Agree on BPM (click track tempo) for each song
- Bring lyric sheets printed or saved offline on your phone
- Prepare 2-3 reference tracks (songs that represent the sound you want)
- Charge all devices; bring a spare set of strings, sticks, or reeds
- Confirm your session start time and the studio's parking and access details
- Get a full night's sleep - vocal performance drops noticeably with fatigue
- Avoid alcohol the night before and limit caffeine on the morning of a vocal session
- Warm up your voice or instrument before you arrive
For a complete run-through of everything to pack, read the guide on what to bring to a recording studio session. For a deeper look at preparation strategy, the studio session prep checklist for musicians covers everything from pre-production demos to your day-of warm-up routine.
Stage 1 - Arrival and Studio Setup
What Happens When You Walk In
Arrive ten to fifteen minutes early. The engineer greets you, shows you around, and explains the layout. Most professional studios divide into two spaces: the live room (or tracking room), where performers record, and the control room, where the engineer sits at the mixing desk and monitors the session through studio monitors. Many facilities also have a vocal booth - a smaller, acoustically treated space designed for vocals or acoustic instruments.
The engineer will ask about your session goals, reference tracks, click tempos, and any technical requirements (does the guitarist want to go DI or mic the amp?). This is a conversation, not an interrogation. Be direct and specific. "I want the drums to sound like early Arctic Monkeys - dry and upfront" is far more useful than "I want it to sound cool."
Setting Up the Live Room
While you settle in, the engineer begins placing microphones. For a drum kit, this is a significant undertaking - kick drum mic (often a Shure Beta 52A or AKG D112), snare top and bottom, hi-hat, toms, overheads (typically large-diaphragm condenser microphones such as the Neumann U87 or AKG C414), and sometimes room mics placed several feet back to capture natural ambience. Guitars may be recorded through a mic'd amplifier (a Shure SM57 on the speaker cone is the industry standard), directly into the desk via a DI box, or both simultaneously.
Mic Placement and Gain Staging
Once microphones are positioned, the engineer checks gain staging - setting the input levels on each preamp channel so the signal is loud enough for a good signal-to-noise ratio without clipping the analog-to-digital converter. Units like a Neve 1073 or API 512c are common in professional UK studios. Most engineers work to a standard of 24-bit/48kHz recording, which captures enough dynamic range and frequency resolution for any commercial release. The full signal chain runs: instrument or voice, to microphone, to preamp, to ADC, to DAW (typically Pro Tools or Logic Pro on a Mac).
How Long Does Setup Take?
Setup time varies considerably by instrument. Here's what to expect:
| Instrument | Typical Setup Time | Notes |
|---|---|---|
| Full drum kit | 60-120 minutes | Multiple mics, tuning, phase checking |
| Bass (DI + amp mic) | 15-30 minutes | Quicker if DI only |
| Electric guitar (mic'd amp) | 20-40 minutes | Amp position and mic placement are critical |
| Electric guitar (DI only) | 10-15 minutes | Fastest option |
| Acoustic guitar | 20-30 minutes | Condenser mic placement is fussy |
| Lead vocals | 15-30 minutes | Mic selection, pop shield, headphone mix |
| Piano/keys (DI) | 10-20 minutes | Stereo DI or MIDI interface |
| Live string section | 45-90 minutes | Multiple mics, room placement |
Stage 2 - Soundcheck and Getting Your Monitor Mix Right
What a Studio Soundcheck Actually Does
A studio soundcheck is not the same as a live soundcheck. In a live setting you're checking the front-of-house speaker system. In a studio, the soundcheck serves two purposes: the engineer confirms that every microphone is capturing a clean signal at the right level, and the performer confirms that their headphone cue mix is right for performing.
The Headphone Cue Mix
When you stand in the live room or vocal booth, you can't hear the control room monitors. Instead, you listen through headphones to a cue mix - a custom blend of your own instrument or voice with the backing tracks, click track, and any other elements you need to perform confidently.
A bad headphone mix produces a bad performance. If your vocal is too quiet in your ears, you'll strain. If the click is buried, you'll rush. If there's too much reverb on your voice, you may pitch flat because the reverb masks your true pitch.
You're completely entitled to ask the engineer to adjust your cue mix. Good engineers expect this.
How to Communicate With Your Engineer About Your Mix
Be specific and simple. Instead of "it sounds weird," say "can I have my vocal louder with less reverb?" Instead of "the guitars are too much," say "can you bring the rhythm guitar down slightly - I'm struggling to hear the kick." Engineers respond well to concrete requests. They're not judging your preferences; they're serving your performance.
Stage 3 - Tracking (Recording Your Parts)
What Is a "Take"?
A take is a single, complete attempt at recording a part - one run through the verse, one full performance of the song, one delivery of the chorus vocal. Takes are numbered sequentially in the DAW (Take 1, Take 2, Take 3) so the engineer can compare them later during comping.
Recording to a Click Track
Unless your song deliberately uses a fluid tempo - a rubato ballad, for example - you'll record to a click track, a metronome pulse fed into your headphones that keeps every instrument locked to the same grid. This is standard practice for professional recordings because it makes editing, comping, and mixing significantly easier. Agree your BPM before the session starts - and test it during rehearsal to confirm the tempo actually feels right for the song.
Scratch Tracks and Guide Vocals
On sessions where the band records together, it's common to lay down a scratch track first - a rough, placeholder recording (often a guide vocal or basic guitar part) that other musicians can react to while tracking their own instruments. The scratch track is typically discarded once all real parts are recorded. Think of it as a musical map, not a finished performance.
Punch-In Recording - Fixing Specific Sections
Punch-in recording lets the engineer drop into record mode at a precise point mid-performance, capture a corrected section, and then drop back out. If you nail the verse but fluff one line in the pre-chorus, the engineer punches in at that exact bar, you sing just that section again, and the rest of the take stays intact. This saves considerable time compared to re-recording the whole song for one problem moment.
How Many Takes Is Normal?
Most professional engineers aim for three to five full passes of any given part before comping. On vocal sessions, eight to twelve passes of a lead vocal is not unusual, especially for emotionally demanding sections. Some artists prefer fewer, longer takes; others prefer more targeted passes. Discuss your preference with the engineer before you start.
Insider tip: Don't obsess over a perfect take in the moment - that's what comping is for. Your job is to deliver honest, energised performances. The engineer's job is to find the best moments across all of them.
Stage 4 - Overdubbing and Layering
What Overdubbing Means in Practice
Overdubbing means recording new parts on top of tracks that already exist in the session. Once the rhythm section - drums and bass - is tracked, the guitarist records their parts while listening back to those drums and bass. Once guitars are done, the vocalist records over everything. Each new layer is added to the multitrack project in the DAW, building up the full arrangement piece by piece.
Building Up Instrument Layers
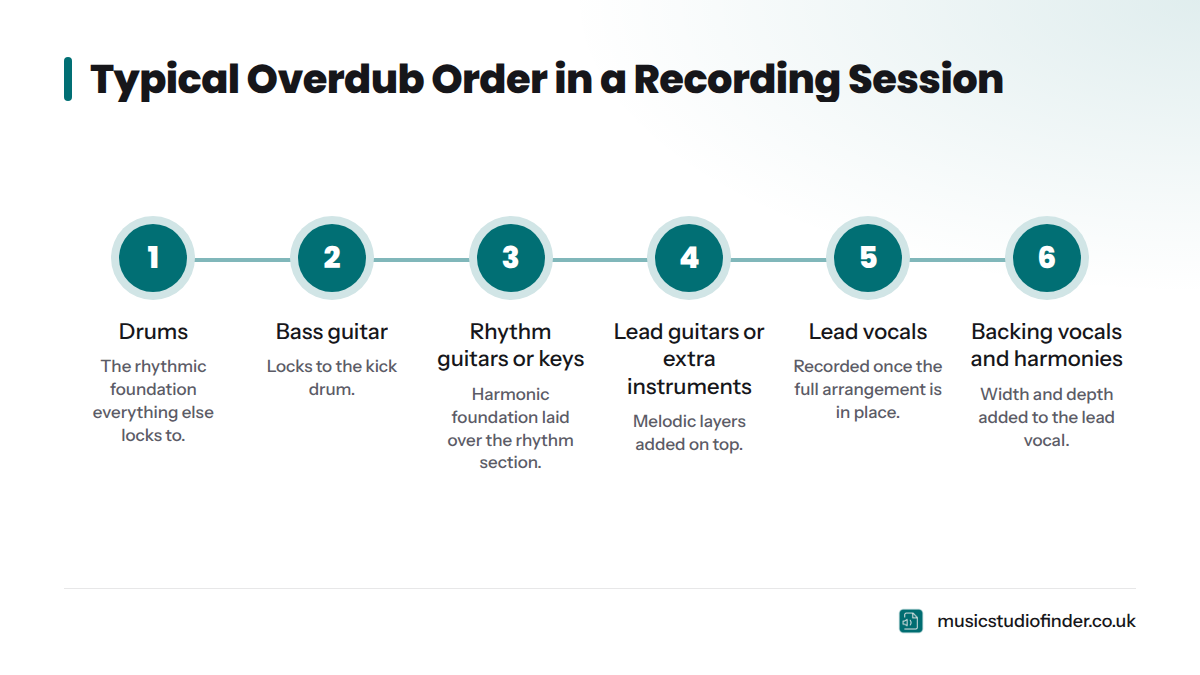
The standard recording order in a professional studio follows a simple logic: establish the rhythmic foundation first, then add harmonic and melodic layers, and record the most emotionally sensitive parts last. Lead vocals go down when everything else is in place, so the vocalist can respond to the full arrangement.
Typical overdub order:
- Drums (the foundation everything else locks to)
- Bass guitar (locks to the kick drum)
- Rhythm guitars or rhythm keys
- Lead guitars or additional instrumentation
- Lead vocals
- Backing vocals and harmonies
- Ear candy - percussion, synth pads, atmospheric textures
Backing Vocals and Harmonies
Harmony sessions are often underestimated in terms of time. Double-tracking - recording the same vocal line twice and panning the two takes apart in the stereo field - adds width and weight to a lead vocal. Stacking harmonies (a third and a fifth above the root melody) gives a track the lush, chorused quality you hear on commercial records. Budget for these sessions explicitly; they take longer to do well than most artists expect.
Stage 5 - Comping the Best Takes
How Comping Works
Comping (short for compiling) is the process of reviewing all recorded takes and assembling the strongest moments into one definitive performance. The engineer listens through Take 1, Take 2, Take 3, marking the phrases where timing was tightest, the note was most in tune, or the emotional delivery was most compelling - then stitches those moments together in the DAW using crossfades to make the joins inaudible.
What the Engineer Listens For
Engineers typically prioritise in this order: timing (is it locked to the grid or the groove?), pitch (is the note accurate?), and feel (does it serve the song?). Modern DAWs like Pro Tools have dedicated playlist views for comping that make auditioning takes side by side fast and efficient.
Should You Be in the Room for Comping?
Yes - and most engineers welcome it. You know your own performance better than anyone. If you remember that Take 4 had a particularly strong chorus, say so. If a comp candidate sounds technically correct but emotionally flat to you, push back. That said, trust the engineer's ear for timing and tuning; they're listening on calibrated studio monitors and have the objectivity you may not have after your twelfth vocal take.
Stage 6 - Rough Mix and Playback
What a Rough Mix Is
After tracking and comping, the engineer creates a rough mix - a quick, unpolished blend of all tracks at approximate levels, with basic EQ and perhaps a touch of reverb on the vocals. This is not the finished product. It's a working reference so you can hear how the song is shaping up before everyone goes home.
Listening Back in the Control Room
For many first-time studio visitors, the playback moment in the control room is the highlight of the day. You sit behind the engineer, the monitors come up, and you hear your performance played back on professional speakers in a professionally treated room. It almost always sounds better than expected - not because anything magical happened, but because the room and monitors reveal detail that a laptop speaker never could.
Giving Useful Feedback
Be specific and musical. "The snare feels a bit boxy" is useful. "The lead guitar feels slightly buried under the rhythm parts" is useful. "I don't like it" is not. Ask for another playback if you need to hear something again. The rough mix session is also when you can flag whether any sections need re-recording - a flat vocal phrase, a timing issue in the bridge - before the engineer closes the session.
Stage 7 - Mixing (Usually a Separate Session)
What the Mix Engineer Actually Does
Mixing is where individual raw tracks are shaped, balanced, and blended into a polished stereo output. It's a skilled, time-intensive process that usually happens in a dedicated session - often days or weeks after the tracking session, giving the engineer fresh ears.
During a mix session, the engineer works through every element: setting fader levels, carving frequency space with EQ (cutting and boosting specific frequency ranges to give each instrument its own sonic space), controlling dynamics with compression, adding depth with reverb and delay, and programming volume and effect changes that respond to the song's arrangement.
EQ, Compression, Effects, and Automation - Explained Simply
- EQ: Tone shaping. Rolling off low-end mud from a guitar, adding presence to a vocal, cutting the boxy resonance from a snare.
- Compression: Reduces the dynamic range of a signal so loud peaks are tamed and quieter moments come forward. Used on virtually every element in a professional mix.
- Reverb/Delay: Adds spatial dimension - the sense that instruments exist in a real physical space rather than a sterile digital void.
- Automation: The engineer programs level, pan, and effect changes that happen automatically as the song plays. A vocal gets louder in the chorus. A guitar pans hard right in the breakdown. Automation is what makes a mix feel intentional rather than static.
Sound On Sound magazine is the UK's most authoritative resource on mixing technique if you want to go deeper on any of these topics.
Stem Exports and Revision Rounds
After the mix is complete, the engineer typically provides a stem export - individual bounced stereo files grouped by instrument family (drums stem, bass stem, guitars stem, vocals stem) alongside the full mix. Stems give you flexibility if you need to remix or remaster later. Most studios include two or three rounds of mix revisions in their project fee. Clarify this before booking.
Stage 8 - Mastering
What Mastering Does (and Why It's Separate)
Mastering is the final stage of audio post-production. A mastering engineer takes the finished stereo mix and applies subtle, broad processing - a touch of EQ to correct tonal imbalance, gentle limiting to achieve commercial loudness, and stereo width treatment - so the track sounds consistent across all playback systems, from earbuds to car speakers to club sound systems.
Most streaming platforms (Spotify, Apple Music, YouTube Music) normalise audio to around -14 LUFS (Loudness Units relative to Full Scale). Mastering ensures your track hits that target without distortion or dynamic loss. The Association of Professional Recording Services (APRS) represents UK studios and engineers working at this level and is a useful point of reference for understanding professional standards in the UK industry.
Most professional engineers recommend leaving at least 24 hours between the final mix and mastering - ideally with a specialist who wasn't involved in the mix. Fresh ears catch things that mix-session ears miss. Some engineers offer same-day mix-and-master packages on budget projects, but the results are generally less refined than a separated workflow.
What You Receive at the End
At the completion of the full production process, you should expect:
- A 24-bit WAV master file (the highest-quality archive version)
- A 16-bit/44.1kHz WAV (CD-ready version)
- A 320kbps MP3 for digital distribution
- Stem files (if agreed in advance)
- A session backup or project file (confirm this before booking)
Read the full breakdown of what's included when you hire a recording studio so you know exactly what to expect before signing anything.
How Long Does a Professional Recording Session Take?
The honest answer: it depends almost entirely on how prepared you are. An artist who arrives knowing every part, with a click tempo confirmed and a clear picture of the sound they want, will achieve more in a day than someone who's still arranging on the clock.
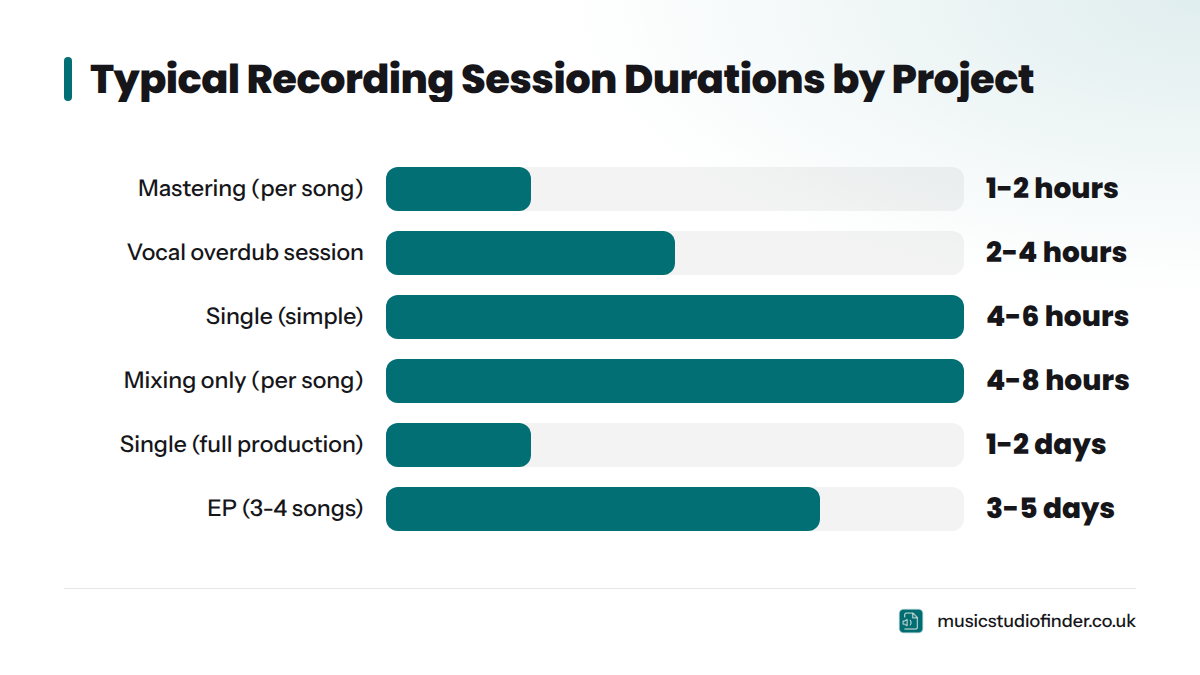
Here are realistic time estimates for common project types:
| Project Type | Typical Duration | What's Usually Included |
|---|---|---|
| Single (1 song, simple) | 4-6 hours | Tracking, comping, rough mix |
| Single (full production) | 1-2 days | Tracking, overdubs, comping, mix, master |
| EP (3-4 songs) | 3-5 days | Full tracking, overdubs, mix sessions |
| Album (10 songs) | 2-4 weeks | All of the above, spread across multiple sessions |
| Vocal overdub session | 2-4 hours | Lead vocals + harmonies for 2-3 songs |
| Mixing only (per song) | 4-8 hours | Mix + 2 revision rounds |
| Mastering only (per song) | 1-2 hours | Final processing + file delivery |
For a focused look at squeezing maximum value from a single day's booking, recording a professional song in one day gives a detailed breakdown of what's achievable. If you're unsure how many hours to book in the first place, the guide on how many hours to book in a recording studio will help you plan your session budget.
Home Studio vs. Professional Studio - What the Difference Actually Costs You
Home recording has never been more accessible. A laptop, an audio interface, and a decent condenser microphone can produce impressive demos. But there are real, measurable differences between a home setup and a professional recording studio session - especially once you factor in acoustics.
| Factor | Home Studio | Professional Recording Studio |
|---|---|---|
| Room acoustics | Untreated - causes colouration and flutter echo | Purpose-built acoustic treatment, bass trapping |
| Microphone quality | Entry-level to mid-range condensers | High-end large-diaphragm condensers (Neumann U87, AKG C414) |
| Preamps | Budget interface preamps | Boutique preamps (Neve, API, Universal Audio) |
| Engineer | Self-directed | Trained engineer, often with years of session experience |
| Monitoring | Laptop speakers or budget monitors | Calibrated near-field monitors in a treated room |
| DAW | Any | Pro Tools, Logic Pro, Studio One - professional configurations |
| Noise floor | Variable - neighbours, traffic, HVAC | Very low - purpose-built isolation |
| Cost | Low upfront, time-intensive | Per-hour rate, time-efficient with good prep |
| Output quality | Demo to intermediate | Release-ready commercial quality |
If you're weighing your options, the full recording studio vs home studio comparison covers the trade-offs in much more depth.
Common Mistakes That Waste Studio Time
I've spoken to engineers across the UK, and the same mistakes come up repeatedly. None of them are about talent - they're all about preparation and communication.
Things to avoid on session day:
- Not knowing your parts. Learning a song in the studio is the most expensive music lesson you'll ever take.
- No click tempo prepared. If you don't know the BPM of your own song, you'll lose 20-30 minutes finding it in the room.
- Skipping vocal warm-up. A cold voice on Take 1 sounds thin and effortful. Warm up before you arrive.
- Poor communication with the engineer. If your headphone mix is wrong, say so immediately - not after four takes where you were straining to hear the kick.
- Bringing a crowd. Extra people in the control room create distraction, noise, and divided attention. Keep your guest list tight.
- Not eating before the session. Low blood sugar tanks your energy and focus. Eat a proper meal and bring snacks.
- Trying to mix while you're tracking. Tracking and mixing require different cognitive modes. Trust the engineer during tracking; save feedback for playback.
- Ignoring recording studio etiquette. Studios are professional environments with shared equipment, schedules, and other clients' sessions before and after yours.
Questions to Ask Your Engineer Before and During the Session
Most musicians never ask enough questions. Engineers appreciate direct, specific questions - it tells them you're engaged and serious. Here are ten worth having ready:
- What recording format will you use? (You want 24-bit/48kHz as a minimum for any commercial release.)
- What microphone are you planning to use on my vocals, and why? (A large-diaphragm condenser suits most voices; a dynamic like the Shure SM7B suits louder, brighter tones.)
- Can I hear a rough level check before we start recording for real?
- How do I flag a bad take? (Some engineers use a code word; others simply stop when the artist stops.)
- How many revision rounds does the mix include in the quoted price?
- Will I receive stem files as well as the stereo master?
- What happens to the session files after we finish - are they backed up?
- Can you adjust my cue mix independently from the main recording level?
- How do you prefer to receive mix feedback - written notes or in the room?
- Is there anything specific I should do differently to make today run smoothly?
What Happens After the Session - File Delivery and Next Steps
The session ends, the engineer hits stop, and you pack up your instruments. The work, though, isn't finished.
What Files You'll Receive
The engineer will consolidate the session, export the agreed files, and typically deliver them within 24-72 hours via a file-sharing service such as WeTransfer or Dropbox. Confirm the delivery format and timeline before the session ends. Mix files follow after the mixing session. Mastered files come last.
How Revision Rounds Work
Most mix packages include two or three rounds of revisions. You receive the mix, listen on multiple systems (studio headphones, laptop speakers, earbuds, your car stereo), compile written notes, and send those back to the engineer. They address the notes and return a revised mix. This cycle repeats until both parties are satisfied or the included revisions are exhausted. Additional revisions beyond the package are usually charged at an hourly rate.
How to Prepare Your Mix Notes
Listen to the mix at least three times before writing anything down. First listen: emotional impression only. Second listen: focus on individual elements - vocal, drums, guitars. Third listen: check the stereo field. Does anything feel too wide or too narrow? Is the low end balanced? Does the vocal sit on top of the track or get buried? Write specific, musical notes. "The snare is too loud in the chorus" is actionable. "Something sounds off" is not.
How Much Does a Professional Recording Session Cost in the UK?
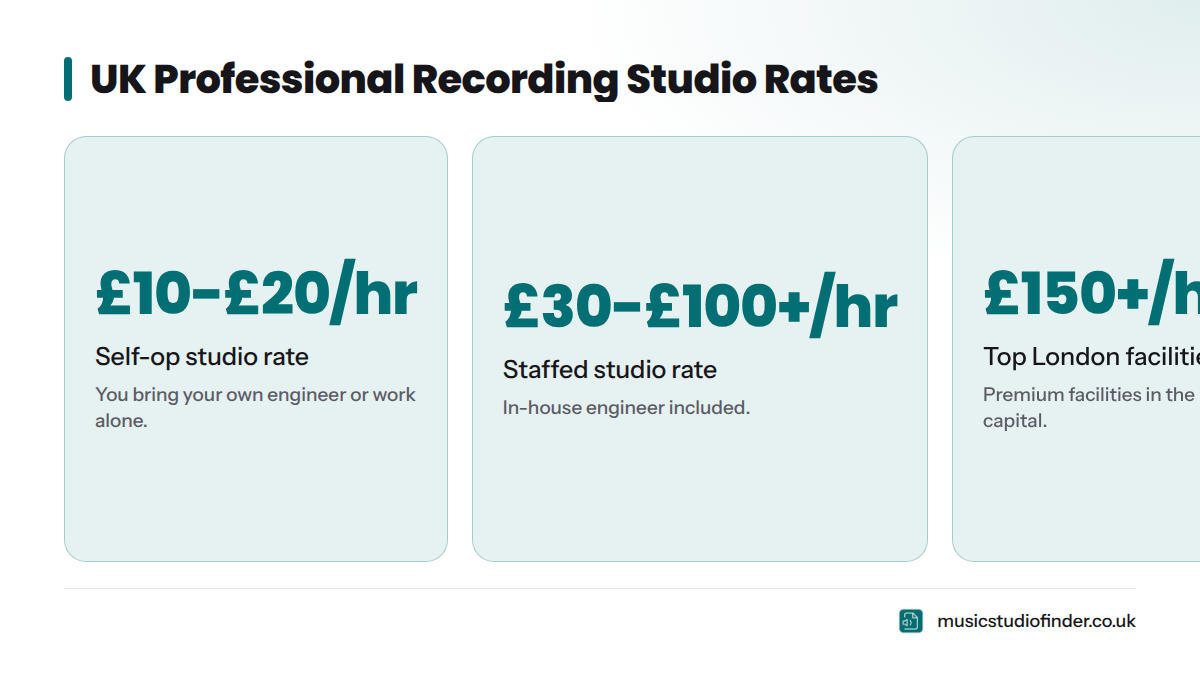
UK studio rates vary by location, facilities, and whether an engineer is included. A self-operated studio (you bring your own engineer or work alone) starts from around £10-£20 per hour. A fully staffed professional studio with an in-house engineer typically runs between £30 and £100+ per hour, with top London facilities charging £150 or more. Day rates covering ten to twelve hours are almost always better value than booking by the hour.
For current, verified UK studio pricing with regional breakdowns, the recording studio cost UK guide is the most complete reference available for 2026. You can browse and compare studios across the UK on the Music Studio Finder recording studio directory to find options that fit your budget and location.
Frequently Asked Questions
What is a recording session? A recording session is a booked period of time at a professional recording studio during which audio is captured, edited, or processed. It can refer to a tracking session (recording live instruments and vocals), an overdub session (adding extra layers), a mixing session, or a mastering session. Most recording projects involve several separate sessions across different stages.
How much is 4 hours of studio time in the UK? Four hours of professional studio time in the UK typically costs between £80 and £400, depending on the studio's location, equipment, and whether an engineer is included. London studios generally charge more than studios in regional cities. Day rates often represent better value than four-hour blocks. Check the recording studio cost UK guide for current regional pricing.
What is the 3:1 rule in audio recording? The 3:1 rule states that the distance between two microphones should be at least three times the distance from each microphone to its own sound source. If a snare mic is placed 10cm from the snare drum, any adjacent tom mic should be at least 30cm from the snare mic. This spacing minimises phase cancellation between microphones, producing a cleaner, more defined recording when multiple mics are used simultaneously.
What should I wear to a recording studio? Wear comfortable, non-restrictive clothing you can perform in freely. Avoid noisy synthetic fabrics like nylon, and remove or tape down any loose metal hardware - belt buckles, jewellery, zip pulls - that could rattle near a microphone. Layers are worth considering; studio live rooms and control rooms often run at different temperatures.
How many takes does a professional singer do? Most professional singers record between five and twelve full passes of a lead vocal, though this varies by artist and song. Engineers typically comp the final vocal from multiple takes rather than aiming for one perfect run-through. More takes give more comping material; fewer, longer takes work well for artists who need to build emotional continuity across the whole song.
What is the difference between tracking and overdubbing? Tracking is the initial recording of live performances - drums, bass, and rhythm parts captured together or one by one. Overdubbing is the process of adding new layers on top of those already-tracked parts. Tracking builds the foundation; overdubbing builds the arrangement on top of it.
Do I need a producer as well as an engineer? Not always. If you have a clear vision for your sound, strong pre-production demos, and the confidence to direct the session, a skilled engineer alone may be sufficient. Producers become more valuable when you want creative input on arrangements, song structure, or performance direction. Many independent UK artists work with engineer-producers who handle both roles.
What happens if I run out of studio time mid-song? Tell the engineer as soon as you notice time is running short - typically with 30 minutes remaining. They can help you prioritise: finish the most important sections, capture a scratch of everything else, or pause and book a follow-up session. Rushing the final minutes of a session rarely ends well. Build a 30-minute buffer into your booking whenever possible.
Can I bring people to my recording session? Yes, but keep numbers small. One or two supportive people in the control room can be motivating. A crowd creates distraction, noise, and in smaller studios, it genuinely interferes with the engineer's focus. Check the studio's policy on guests before you arrive; some have a strict limit on control room occupancy.
What do I receive at the end of a recording session? At the end of a tracking session you typically receive a rough mix WAV file for reference. After the mixing session you receive the final stereo master in multiple formats (24-bit WAV, 16-bit WAV, MP3). After mastering you receive the fully processed, release-ready masters. Stem files and session backups are extras to negotiate in advance.
Find a Professional Recording Studio in the UK
Whether you're recording your first single or your third album, finding the right studio makes a measurable difference to both the process and the result. Music Studio Finder is the UK's dedicated studio discovery platform, listing professional recording studios from London to Edinburgh - including fully staffed facilities with in-house engineers, self-op studios for experienced artists, and specialist vocal and acoustic recording spaces.
Search by location, budget, and available equipment to find a studio that matches your project. The how to choose a recording studio guide walks through the key questions before you commit to a booking, and the guide on how to find a recording studio near you is a good starting point if you want to work outward from your location.