Booking studio time feels exciting right up until you're sitting in the live room, the red light is on, and you realise you haven't quite decided how the bridge goes. That feeling - a cocktail of embarrassment and dread - costs real money. At typical UK rates of £40-£80 per hour, an hour of indecision is an expensive lesson.
This is a complete pre-production planning guide for independent musicians preparing a song for a recording studio session. Work through every step and you'll walk in with clarity, confidence, and a plan your engineer can follow from the first minute. You'll also walk out having spent less.
Why Pre-Production Is Where Recordings Are Actually Made
What Pre-Production Means in Practice
Pre-production is everything that happens before you press record in a professional studio. Writing, arranging, demoing, rehearsing, planning - the full creative and logistical process of turning a rough idea into a recording-ready piece of music.
The term comes from film and television, where pre-production means all the planning done before cameras roll. The logic translates directly to music: the cleaner your preparation, the smoother the actual recording. As Sound on Sound puts it, pre-production is where recordings are really made - not in the studio itself.
The Direct Financial Argument for Preparation
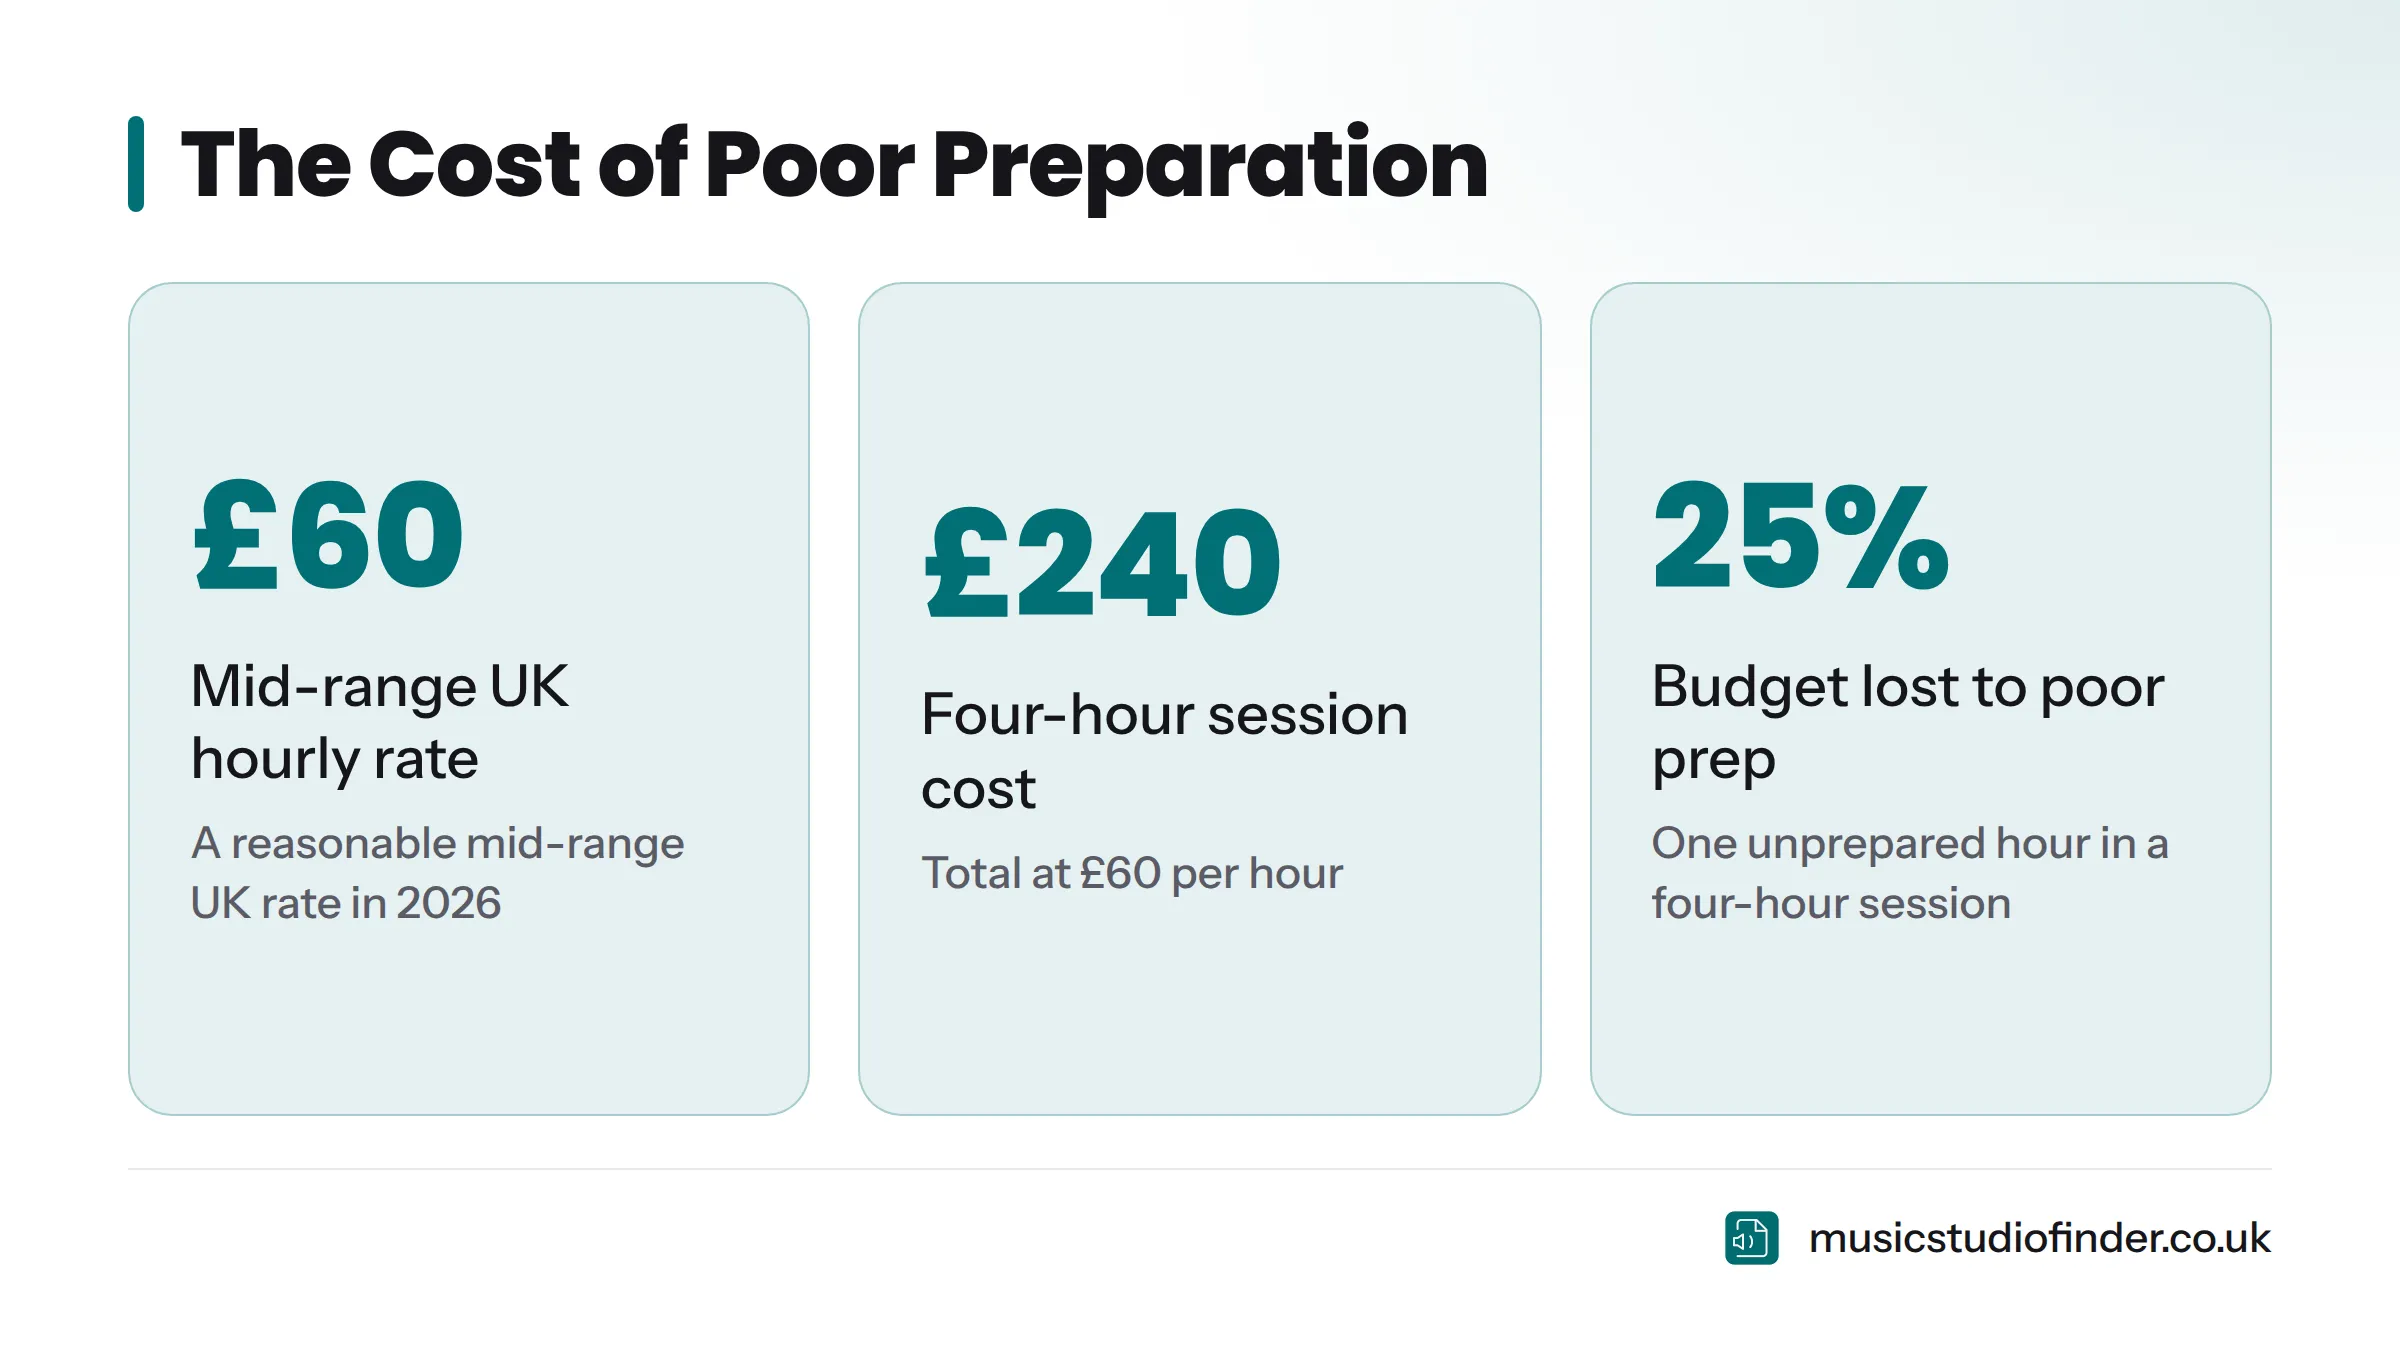
Here is the maths. Say you book a four-hour session at £60 per hour - a reasonable mid-range UK rate in 2026. That's £240. Spend the first hour debating song structure, re-tuning instruments you should have sorted at home, or hunting through your phone for lyrics, and you've used 25% of your budget producing nothing.
Arrive prepared and that first hour is tracking. The recording studio cost UK guide on Music Studio Finder breaks down what you should expect to pay at different budget levels - worth reading before you book so you understand exactly what's at stake per hour.
What "Studio Ready" Actually Looks Like
Being studio ready means every decision that can be made before the session has been made. Your song has a fixed structure. Your tempo is locked. You can play or sing your part from start to finish without stopping. You have a home demo, a chord chart, and reference tracks ready to share with your engineer. Your instruments are set up and in tune. Your lyrics are memorised.
Studio ready is not about being perfect. It's about being prepared enough that the session can focus entirely on capturing great performances and making creative production decisions - not solving basic logistical problems.
Step 1 - Lock Your Song Structure and Arrangement
Map Out Every Section Before Anything Else
You need a written map of your song before you do anything else. Label every section: intro, verse 1, pre-chorus, chorus, verse 2, chorus, bridge, final chorus, outro. Know exactly how many bars each section lasts.
This is not creative overkill - it's the foundation of a productive session. Engineers and session musicians need to know where they are in a song at any moment. If you can't tell them "the bridge is 8 bars in A minor," you're burning time.
A One-Page Song Map Your Engineer Can Actually Use
Write it out like this:
| Section | Bars | Key / Chord | Notes |
|---|---|---|---|
| Intro | 4 | G major | Guitar only |
| Verse 1 | 16 | G / C / D | Verse melody starts bar 1 |
| Pre-Chorus | 8 | Em / D | Build - drums enter bar 5 |
| Chorus | 16 | G / C / D / Em | Full band |
| Verse 2 | 16 | G / C / D | Add harmony vocal |
| Chorus x2 | 32 | G / C / D / Em | - |
| Bridge | 8 | Am / D | Stripped back |
| Final Chorus | 16 | G / C / D / Em | Big ending |
| Outro | 8 | G | Fade or cold stop |
Send this to your engineer before the session. It takes 20 minutes to write and can save an hour of back-and-forth on the day.
What to Lock Down vs. What to Leave Open
Lock your core structure - the number of sections, their order, and their length - before you book. Leave production details like vocal harmonies, guitar tones, and effects treatments deliberately open. The best engineers and producers add real value during a session, but only when the scaffolding is already up.
Arrangement mistakes that waste studio time:
- Undecided bridges ("let's figure it out in the studio" is a budget killer)
- Songs that run longer than they need to
- Sections that have never been rehearsed as a band because "we'll work it out"
- No agreement on the ending - cold stop, fade, or ritardando - leaving the engineer guessing
Step 2 - Set and Lock Your Tempo (BPM)
Why Your BPM Must Be Decided Before You Arrive
Your BPM (beats per minute) is the foundation of everything the engineer builds around your performance. It dictates the click track, determines whether any MIDI or programmed elements sync correctly, and affects how the DAW grid aligns with your audio. Change it mid-session and you may need to redo work that's already done.
Lock your tempo before session day. Test it at multiple speeds using a metronome app before committing - a tempo that feels right at home may feel rushed or sluggish in a live room with headphones on.
How to Test Whether the Tempo Actually Fits
Play through your song with a metronome at the BPM you think is correct. Then try it 2 BPM faster and 2 BPM slower. Record yourself - even on a phone - at each speed and listen back. The right tempo is the one that feels neither rushed nor dragged, both lyrically and instrumentally.
For songs with tempo variations, map each section's BPM separately and note them on your song map.
What to Send to the Studio in Advance
Once your tempo is locked, export a click track from your DAW - GarageBand, Logic Pro, Ableton Live, or Pro Tools all do this in a few clicks. Export it as a stereo WAV file at 44.1 kHz / 24-bit. Send it to the studio in advance so the engineer can confirm compatibility with their system.
Here is a quick BPM reference by genre:
| Genre | Typical BPM Range |
|---|---|
| Ballad / Slow Soul | 60-80 BPM |
| R&B / Neo Soul | 70-100 BPM |
| Indie Rock / Pop | 100-130 BPM |
| Punk / Fast Rock | 150-180 BPM |
| Dance / EDM | 120-140 BPM |
| Hip-Hop | 70-100 BPM |
| Country | 80-120 BPM |
| Drum & Bass | 160-180 BPM |
Step 3 - Record a Home Demo Before You Book
What a Usable Demo Actually Needs
A home demo is not a finished product. It's a working blueprint - a rough recording that captures the song's structure, melody, chords, and feel clearly enough that another person can understand what you're going for.
At minimum, your demo should include:
- A scratch vocal or guide melody (even hummed)
- The main chordal instrument (guitar or keys)
- A representation of the rhythm (a drum loop or tap percussion works fine)
- All sections of the song in the correct order
If the song features harmonies, backing vocals, or a specific instrumental arrangement, include rough versions of those too.
Tools That Work - From Phone to DAW
You don't need a home studio to make a usable demo. Options include:
- Apple Voice Memos - record guitar and vocals simultaneously on any iPhone; exports as M4A
- BandLab (free, iOS/Android) - multi-track recording, drum machines, basic mixing
- GarageBand (free on Mac and iOS) - arguably the most accessible full-featured demo tool available
- Audacity (free, desktop) - simple multi-track recording for PC and Mac
- Logic Pro / Ableton Live - if you already have one of these, use it
The file quality doesn't have to be pristine. The engineer needs to hear your song, not a polished production.
How to Use Your Demo to Brief Your Engineer
Send the demo to your engineer at least a few days before the session with a note explaining what you like about the demo's feel and what you want to change in the studio. This one action saves significant back-and-forth at the start of the session. You're arriving with a shared reference point rather than starting from zero.
Step 4 - Write Out Chord Charts and Song Sheets
Why Chord Charts Matter Even If You're the Only Performer
A chord chart is a document showing which chords are played in each section of a song, often with section structure and bar lengths noted alongside. Session musicians, keyboard players, and backing vocalists use chord charts to follow along without learning a song by ear in the session. Engineers use them to understand the harmonic structure of your track.
How to Write a Simple Chord Chart Without Reading Music
You do not need to read music notation. Use chord names (G, C, Em, D) alongside the section labels and bar counts you've already written on your song map. Here's a simple example for a verse:
VERSE 1 (16 bars, 4/4 time, 110 BPM)
| G     | G     | C     | C     |
| G     | G     | D     | D     |
| Em    | Em    | C     | C     |
| G     | D     | Em    | D     |
If your song uses a capo, note which fret. If it uses non-standard tuning, note that too. That is all you need.
The Nashville Number System is an alternative approach used widely by session musicians - it replaces chord names with numbers (1, 4, 5) relative to the key, making charts key-agnostic. Worth learning if you work with session players regularly.
Send Charts to Session Musicians Before the Day
Print or PDF your chord charts and send them to any session musicians before the session. A guitarist or bassist who has studied your chart for 30 minutes at home is far more productive than one sight-reading it for the first time in the live room. This is a professional courtesy that makes you easier to work with - and studios notice.
Step 5 - Choose and Prepare Your Reference Tracks
What a Reference Track Is and Why It Saves Time
A reference track is an existing commercially released song that you share with your engineer or producer to communicate the sonic direction, mix style, production feel, or vocal approach you want your recording to achieve. It is creative shorthand: instead of spending 20 minutes describing "that big, wide drum sound with lots of room reverb," you play them the track that has it.
How to Pick the Right Two or Three References
Pick two or three tracks - not 15. Each reference should address a different element:
- Tone and production feel - a song with the overall vibe you're after
- Mix reference - a song with the balance, space, and dynamics you want
- Vocal approach - a song where the vocal treatment (compression, reverb, doubling) matches your goal
Your references don't need to be in the same genre as your song. An indie rock artist who wants a dry, present vocal might reference a Radiohead album track even if their song is a pop ballad.
How to Brief Your Engineer on Reference Tracks
Don't just send a Spotify link and leave it at that. Use this format:
Reference track briefing:
- Song: [Artist] - [Track Title]
- What I like about it: [Specific element - e.g., "the reverb on the snare," "the width of the acoustic guitar," "the breathy intimacy of the vocal"]
- What I want differently: [e.g., "I want our bass to sit further forward than this"]
This takes five minutes to write and positions you as a prepared, communicative artist that engineers genuinely enjoy working with.
Step 6 - Practise With a Click Track Until It Feels Natural
Why Click Track Practice Is Non-Negotiable
Recording to a click track is standard practice in almost every professional recording studio. It keeps performances in sync with the DAW grid, makes editing and comping far easier, and ensures that if you overdub a part later, it lines up perfectly.
Playing to a click for the first time in a studio session - with headphones on and a recording engineer watching - is a stressful experience. Many musicians who can play their parts confidently lose their timing the moment they hear a click in their ears for the first time. Practise at home until playing to a click feels completely natural.
A Practical Click Track Practice Routine
- Set a metronome app (or your DAW's built-in click) to your song's locked BPM
- Play through the song from start to finish - not section by section, the whole thing
- If you lose the click, don't stop - recover and keep going. That skill is exactly what you need in the session
- Record yourself playing to the click and listen back for where your timing drifts
- Identify the specific moments (usually transitions between sections, fills, or held notes) where you drift and practise those spots in isolation
Apps like GarageBand and free metronome apps on iOS and Android make this accessible to anyone with a smartphone.
If the Click Genuinely Disrupts Your Performance
Consider booking a session at a rehearsal studio with a click track running through the PA or a monitor mix - it's a lower-stakes environment to practise. Some musicians find it easier to feel a click buried slightly lower in the mix rather than front and centre. Tell your engineer your preference before the session starts.
Step 7 - Prepare Your Instruments
Guitar and Bass: New Strings, Intonation, Setup
Re-string your guitar and bass at least 48 hours before the session - not the night before. Fresh strings go sharp under studio lighting and body heat if they haven't had time to settle. Put new strings on 48-72 hours ahead, stretch them in, and tune them repeatedly until they hold pitch reliably.
Check intonation (whether the guitar plays in tune up the neck, not just open) and the action (string height). If your guitar buzzes or plays sharp at the 12th fret, have a luthier check it before the session.
Bring spare strings and a clip-on tuner. Studios usually have tuners, but bringing your own ensures you're not wasting session time waiting for equipment.
Drums: New Heads, Tuning, Spare Hardware
New drum heads make a bigger difference to recorded drum sound than almost anything else in a session. Replace batter heads at least a week before recording - they need playing time to open up and stabilise. If you're recording at a studio that provides a drum kit, contact them in advance to ask when the heads were last replaced.
Check all hardware: snare wires, bass drum pedal springs, hi-hat clutch, cymbal felts. Bring spare sticks, hi-hat clutch nuts, and a drum key. Rattling hardware ruins takes.
Keys and Synths: Patches Saved, DI Signals Tested
If you're using hardware synths or keyboards, save your patches in advance and test the DI signal chain. Know which outputs you'll use and whether the studio has the right cables. If you're using software instruments inside a DAW, export MIDI or audio stems in advance so the session doesn't depend on the studio running your specific software.
Vocals: Don't Experiment the Week Before
The week before a studio session is not the time to try new vocal techniques. Lock in what works for you, focus on consistency, and book a session with a vocal coach a month ahead if you have specific challenges (pitch, support, breath control). Attempting to overhaul your technique days before recording creates inconsistency.
For a detailed look at what else to pack, the what to bring to a recording studio session guide covers the full kit list.
Step 8 - Prepare Your Vocals
A Simple Warm-Up Routine for Session Day
A cold vocal is an unreliable vocal. Spend 10-15 minutes warming up before you arrive at the studio. A simple routine:
- Lip trills or humming - 2 minutes, low to high range
- Sirens (smooth glide from your lowest to highest comfortable note and back) - 2 minutes
- Vowel exercises (mah, may, mee, mo, moo) across a scale - 3 minutes
- Light singing of your actual song at half-volume - 5 minutes
Don't go full-power at home before the session. You're opening your voice up, not performing. Save the energy for the take.
What to Avoid in the 24 Hours Before Your Session
- Alcohol - dehydrates the vocal folds and makes them puffy. Avoid it entirely the night before
- Dairy - creates mucus and coats the throat, causing excessive clearing. Skip milk, cheese, and cream
- Caffeine - a mild diuretic that reduces vocal fold lubrication; keep it minimal on session day
- Shouting or speaking loudly - at concerts, over loud music, or in noisy environments
- Dusty, smoky, or dry environments - they dehydrate and irritate vocal tissue
The Musicians' Union UK publishes guidance on musician health and wellbeing that includes vocal care recommendations worth reviewing.
The Night-Before Hydration and Rest Protocol
Drink 2-3 litres of water consistently throughout the day before your session. The hydration that benefits your vocal folds on recording day was absorbed 12-24 hours earlier - sipping water in the vocal booth has minimal immediate effect. Sleep at least 7-8 hours. Fatigue shows in a vocal performance more immediately than almost any other factor.
Memorise Your Lyrics Completely
This sounds obvious, but it is one of the most common reasons sessions run over. Singers who have to glance at a lyric sheet - even occasionally - lose performance quality, focus, and their connection to the microphone. Memorise your lyrics to the point where you can sing them while doing something else. That level of recall is what a studio performance demands.
Step 9 - Prepare Your Files and Session Materials
What to Send to the Studio at Least 48 Hours Before
Send the following to your engineer in advance:
| File | Format | Purpose |
|---|---|---|
| Home demo | WAV or MP3 | Gives the engineer your song blueprint |
| Click track / tempo map | WAV, 44.1 kHz / 24-bit | Sets the DAW grid correctly |
| Backing track (if applicable) | WAV, 44.1 kHz / 24-bit, stereo | For sessions where playback is required |
| Chord chart / song map | Engineer and session musician reference | |
| Reference tracks | Spotify links or MP3s | Communicates tone, mix, production direction |
| Session notes | Text or PDF | Microphone preferences, signal chain notes, anything specific |
How to Name and Organise Your Tracks
Use a consistent naming convention: [Artist] - [Song Title] - [Instrument] - [Version]. For example:
JoannaReid_GoldenRoom_AcousticGuitar_Demo_v1.wavJoannaReid_GoldenRoom_Click_110BPM.wav
Avoid spaces in filenames. Avoid abbreviations the engineer won't recognise. A clearly named session file saves time and signals professionalism before you've played a single note.
Export Standards That Matter
Export all audio at 44.1 kHz / 24-bit WAV - the professional recording standard. Avoid MP3 for session files; the compression artefacts in MP3 format affect quality when editing. MP3 is acceptable for sharing demo references, but all working stems and click tracks should be WAV.
If your backing track contains separate stems (kick, bass, pads, etc.), export them as individual files rather than a single stereo bounce. This gives the engineer mixing flexibility.
Step 10 - Communicate With Your Engineer Before the Session
What to Include in Your Pre-Session Email
A five-minute email sent a few days before your session is one of the most underused tools in pre-production. Include:
- The song title, BPM, and key
- The structure (or attach your song map)
- What you're recording in the session (tracking drums? vocals only? full band?)
- Your home demo (attached or linked)
- Your reference tracks with brief notes on what you like about each
- Any technical preferences (e.g., "I prefer a slightly brighter headphone mix when tracking vocals")
- The names of any session musicians joining you
Questions to Ask the Studio Before Session Day
Before you turn up, get answers to these:
- What DAW do you use, and can you receive my stems in that format?
- What drum kit is available, and when were the heads last replaced?
- Do you have a DI box for bass and keys?
- What's the headphone monitoring setup in the live room?
- Can I send you a click track and backing track in advance?
- What is the signal chain for vocals - which microphone will you likely use?
The questions to ask before booking a music studio guide has a full list of studio-specific queries worth checking.
Align on Session Goals at the Start of the Day
At the start of the session, spend five minutes aligning with your engineer on exactly what you plan to achieve. State clearly: "Today we're tracking drums and bass, with scratch vocals as guide tracks. We want to leave with a solid rhythm section and at least one keeper drum take." That framing helps the engineer pace the session and flag if the schedule looks unrealistic before you're two hours in.
Step 11 - Plan Your Session Day Schedule
Record the Hardest Parts First
Record the most technically demanding and physically tiring elements early in the session when everyone is fresh. For most songs, that means drums first, then bass, then guitar and keys as overdubs, with lead vocals last. If you're a solo artist recording vocals only, your first take of the session will often be your best - treat it seriously, even if you plan to do multiple passes.
A Realistic Four-Hour Session Schedule
Work backwards from your end time. A four-hour session tracking a single song might look like this:
| Time | Activity |
|---|---|
| 00:00-00:30 | Setup, headphone mix, warm-up takes |
| 00:30-01:30 | Drum tracking (multiple takes) |
| 01:30-02:00 | Bass tracking |
| 02:00-03:00 | Guitar / keys overdubs |
| 03:00-03:45 | Lead vocal takes |
| 03:45-04:00 | Rough mix and playback review |
The how long does it take to record a song guide offers detailed estimates for different recording scenarios - worth checking before you book your hours.
How Bands Should Coordinate Preparation
Bands face a coordination challenge that solo artists don't. Assign one person as the session spokesperson - the band member who communicates with the engineer before and during the session. Everyone should arrive having independently done the work: practised to a click, memorised their parts, prepared their instruments. Run at least one full rehearsal of the song at the locked BPM within the week before the session.
For bands, booking a rehearsal studio in the weeks leading up to your recording session is not optional - it's part of the pre-production process. Trying to tighten a band performance inside a paid recording session is expensive and time-consuming.
Step 12 - Prepare Mentally and Physically
Managing Studio Nerves
Studio anxiety is normal, even for experienced musicians. The red recording light, the silence of an isolation booth, and the awareness that every note is being captured can make even familiar parts feel suddenly foreign.
Here is what helps: reframe the session as a rehearsal that happens to be recorded. You're not performing for an audience - you're capturing music. Studios run on re-takes. No recording engineer in the world expects a perfect first take, and the best ones actively create an atmosphere where imperfection is part of the process.
Arrive early. Spend time getting comfortable in the space before tracking begins. Let your engineer know if nerves are affecting your performance - they can adjust the monitoring mix, change the lighting, or simply give you a moment to reset.
How to Approach Re-Takes Without Losing Momentum
The worst thing you can do after a bad take is catastrophise it. Acknowledge it, identify specifically what went wrong (pitch in the second chorus, timing in the bridge), adjust, and go again. Keep your self-assessment factual and brief. Engineers follow your emotional lead - stay calm and constructive and the session stays productive.
For more on session-day conduct, the recording studio etiquette guide has everything you need on how to behave professionally in the studio environment.
Sleep, Nutrition, and Hydration on Session Day
Eat a proper meal two hours before the session - not immediately before (it affects breath support) and not on an empty stomach (it affects focus and energy). Avoid heavy or greasy food. Bring water, throat lozenges if your voice is prone to dryness, and a light snack for mid-session energy.
Do not arrive sleep-deprived. Fatigue degrades musical judgment, reaction time, and emotional performance quality more than almost any other factor.
Your Pre-Studio Preparation Timeline (Week-by-Week)
Use this countdown to structure your recording session tips and preparation:
| Timeframe | Task |
|---|---|
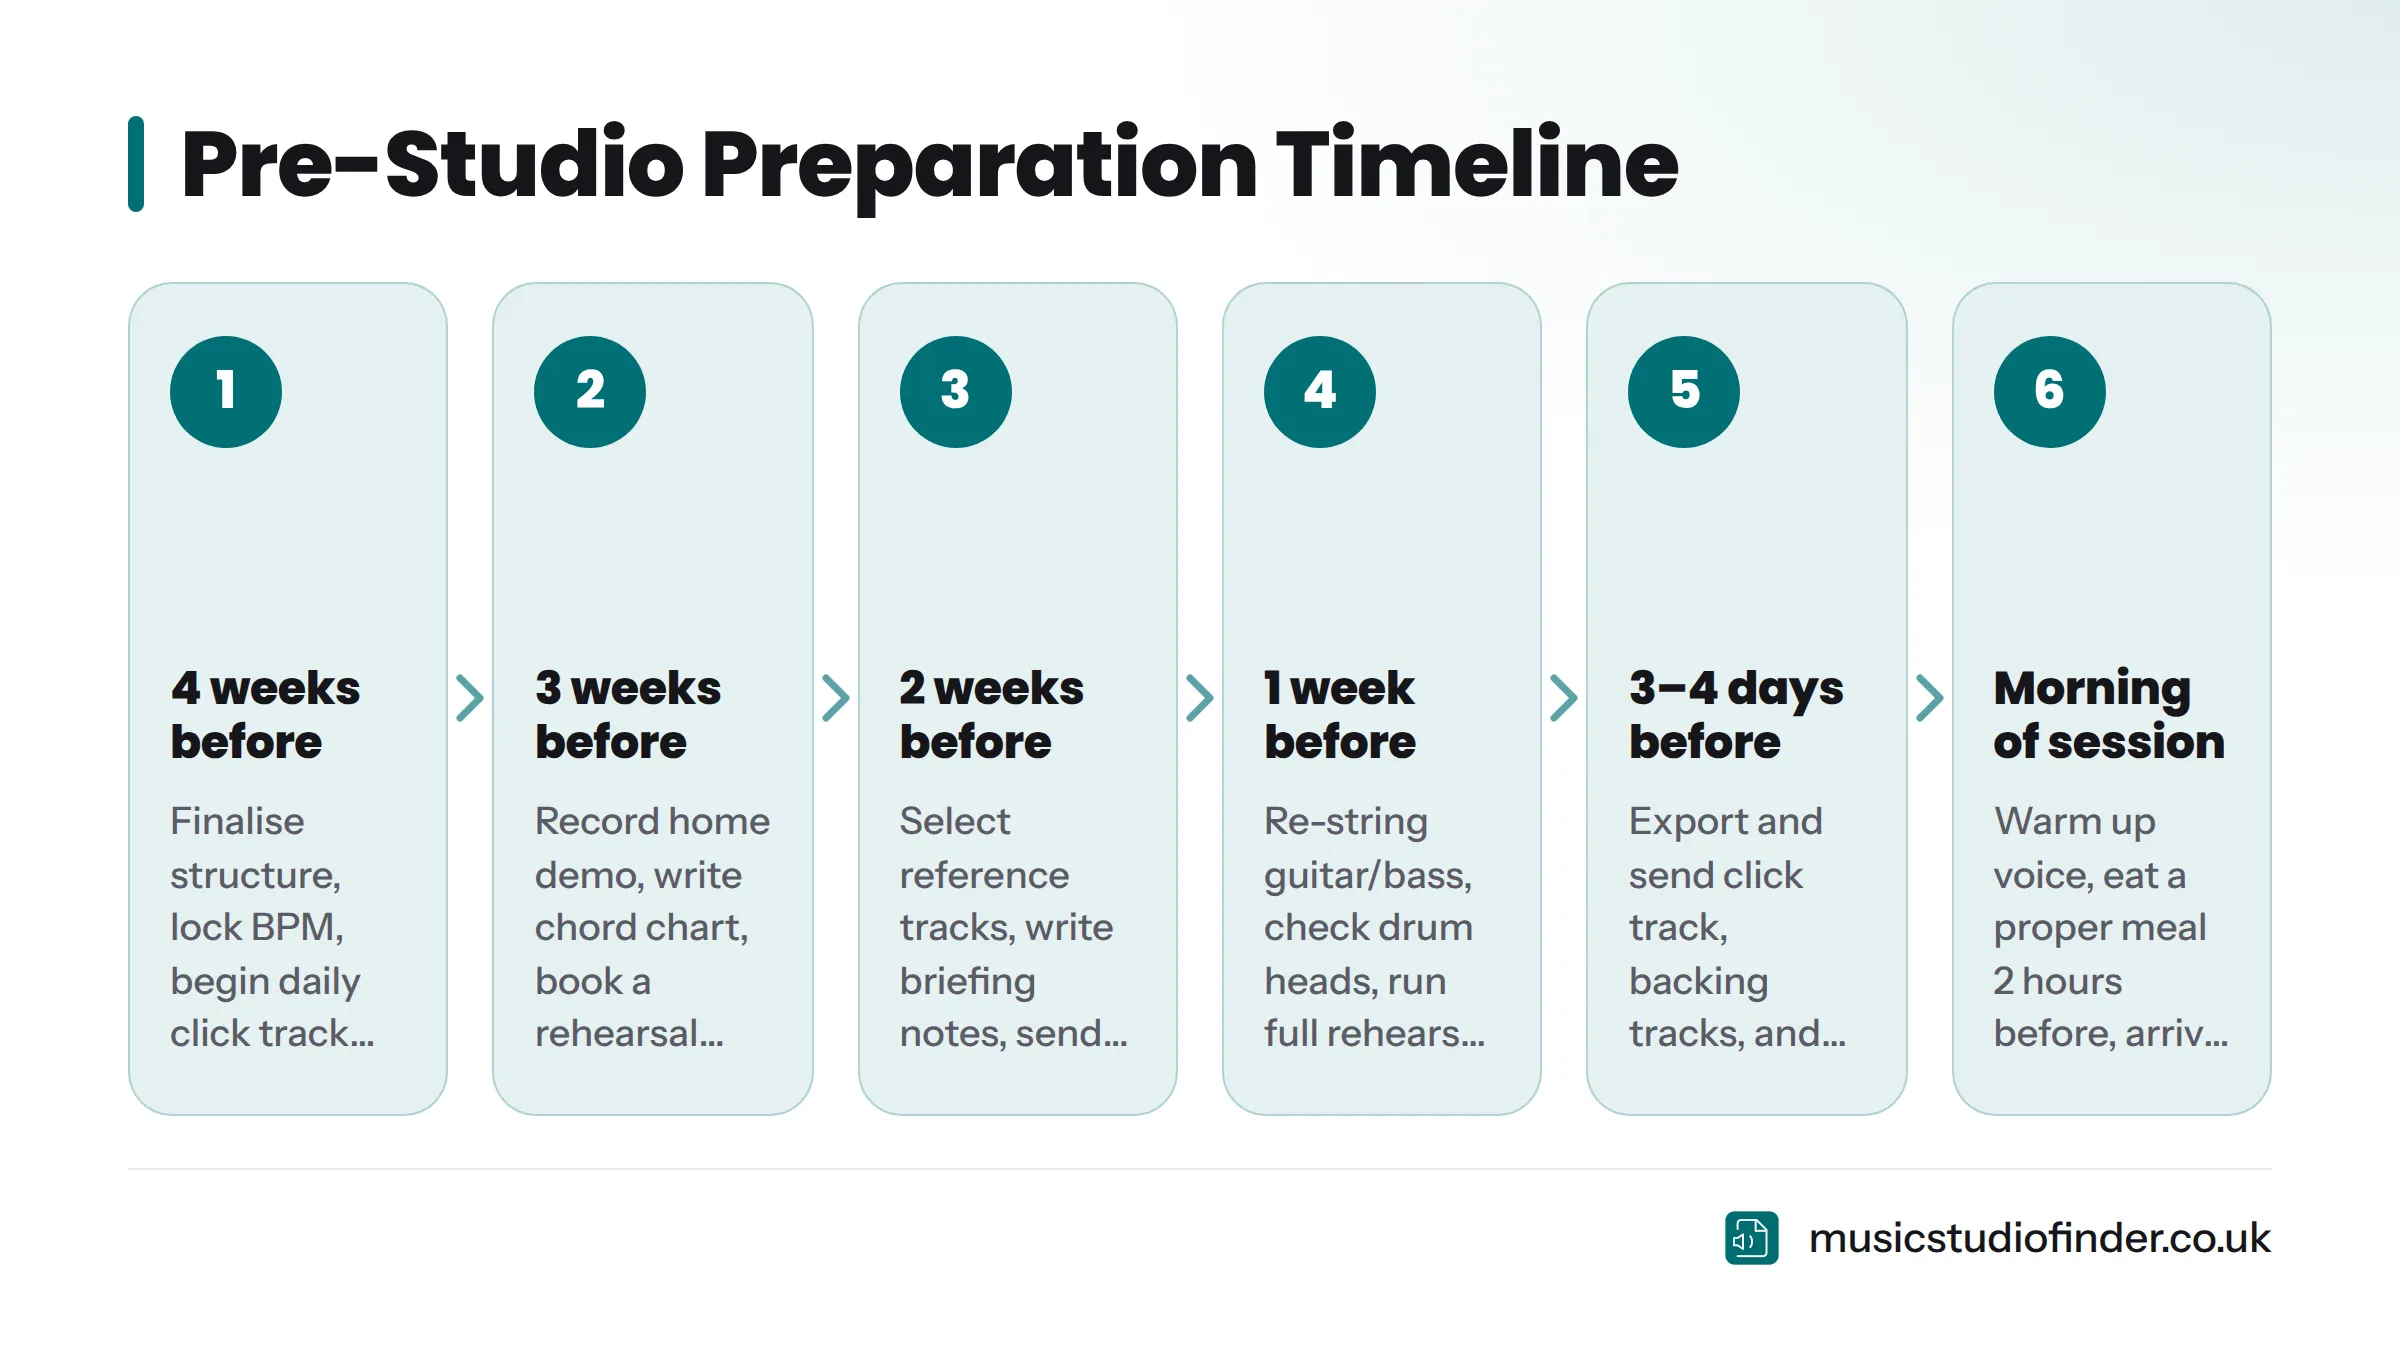
| 4 weeks before | Finalise song structure and arrangement. Lock BPM. Begin click track practice daily. |
| 3 weeks before | Record home demo. Write chord chart. Book a rehearsal studio session. |
| 2 weeks before | Select reference tracks. Write reference briefing notes. Send demo and chord chart to your engineer. |
| 1 week before | Re-string guitar/bass. Check drum heads. Run full run-throughs to click track. Run full band rehearsal (if applicable). |
| 3-4 days before | Export and send click track, backing tracks, and session files to the studio. Confirm session logistics. |
| Night before | No alcohol. No dairy. Early dinner. 8 hours sleep. Vocal rest if possible. |
| Morning of session | Warm up voice. Eat a proper meal 2 hours before. Arrive 10-15 minutes early. |
Studio Ready Checklist: A Pre-Session Self-Assessment
Run through this before you confirm your booking. If you can't tick every box, use the gaps as a preparation to-do list.
Song and Arrangement
- Song structure is fully mapped and documented
- BPM is locked and tested at that tempo repeatedly
- Chord chart is written and formatted clearly
- Every section has a defined length in bars
- Ending (cold stop, fade, etc.) is decided
Demo and References
- Home demo recorded with all main parts present
- 2-3 reference tracks chosen with briefing notes written
- Demo and reference materials sent to engineer in advance
Instruments
- Guitar/bass re-strung 48-72 hours before session
- Intonation and action checked
- Drum heads replaced (or confirmed with studio)
- All hardware checked - no rattles or squeaks
- Keyboard patches saved and DI signal tested
Vocals
- Lyrics memorised completely - no lyric sheet needed
- Vocal warm-up routine established
- Night-before protocol confirmed (no alcohol, no dairy, hydrated)
Files and Communication
- Session files named and organised correctly
- Click track and any backing tracks exported as 44.1 kHz / 24-bit WAV
- All files sent to studio at least 48 hours before
- Pre-session email sent to engineer with song details, demo, and references
Mental and Physical
- Practised the full song to click track multiple times without stopping
- Session schedule planned and shared with bandmates (if applicable)
- Sleep and nutrition plan confirmed for the night before and morning of
What Poor Preparation Actually Costs You
Let's be direct. Studio time in the UK costs between £30 and £150 per hour depending on the studio, its location, and what's included. The recording studio cost UK guide shows that most independent artists book sessions in the £40-£80 per hour range.
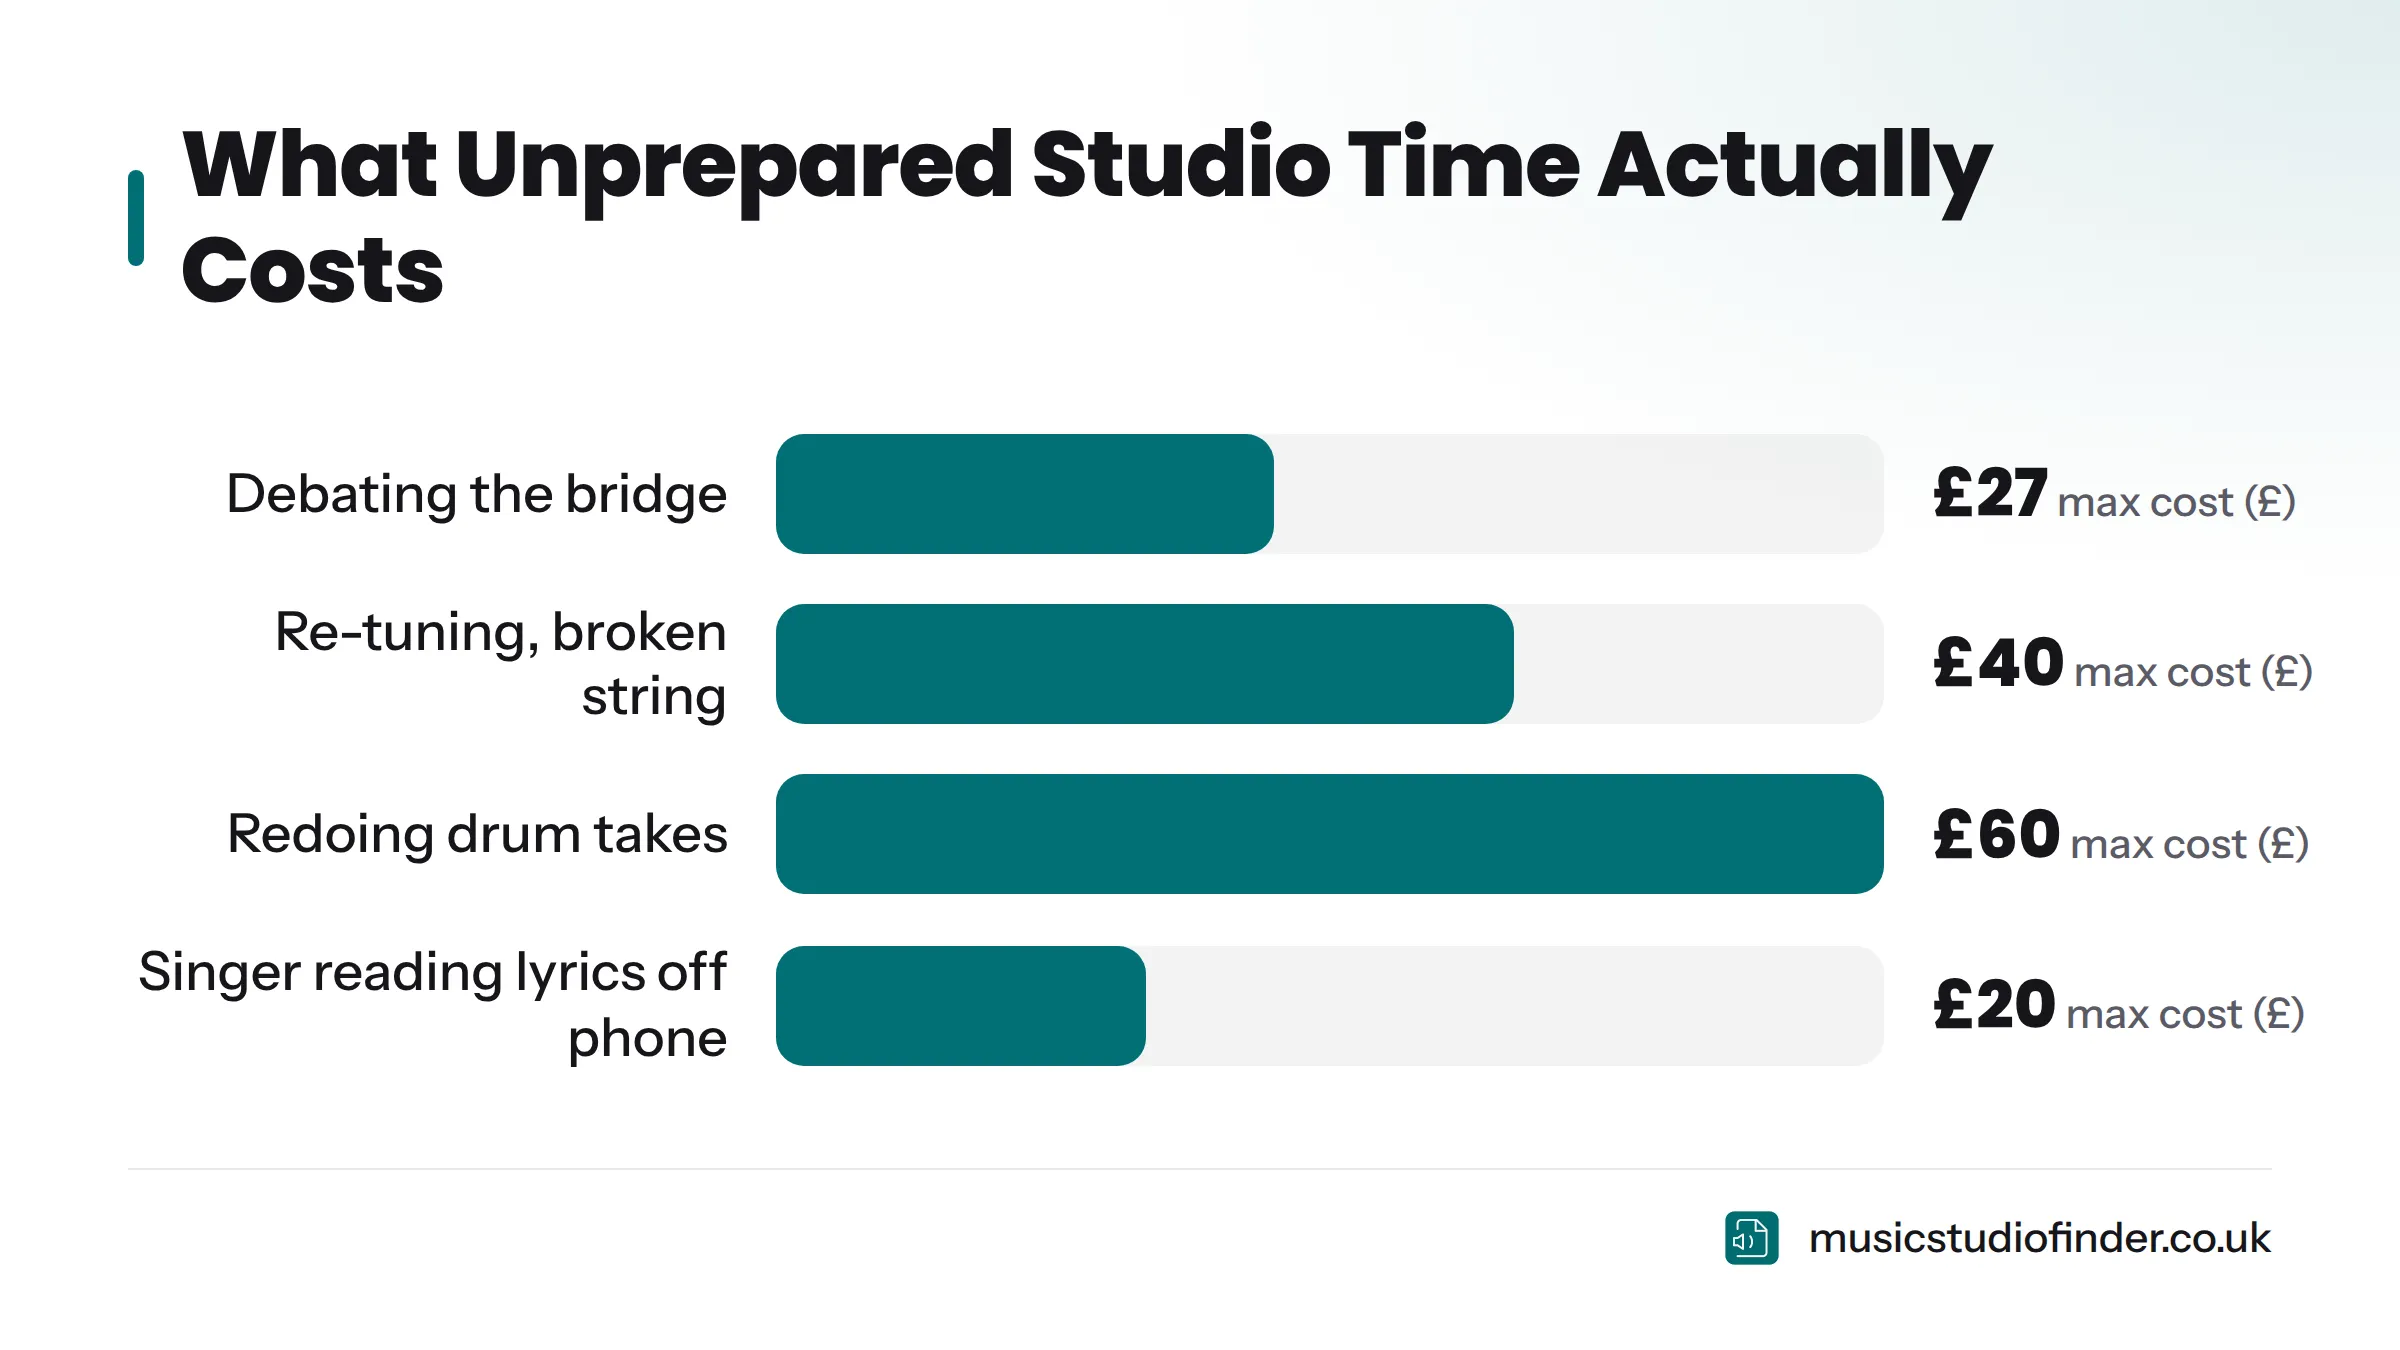
Here is what unprepared looks like in financial terms:
- 20 minutes debating whether the bridge should repeat: £13-£27
- 30 minutes re-tuning instruments and replacing a broken string: £20-£40
- 45 minutes redoing drum takes because the tempo wasn't agreed: £30-£60
- 15 minutes of a singer reading lyrics off a phone: £10-£20
That's up to two hours of a four-hour session - £73-£147 - spent on problems that could have been solved at home for free.
Preparation is a financial decision as much as a creative one. Every hour of work you do before the session is studio time you don't have to pay for. For more on making your budget go further, the how to save money on recording studio time guide has specific, actionable strategies.
The how many hours to book in a recording studio guide also helps you estimate the right session length once you're genuinely prepared - which is usually shorter than you'd expect.
Frequently Asked Questions
How long before a studio session should I start preparing my song?
Start your pre-production at least four weeks before the session. Use the first two weeks to lock your arrangement, record your demo, and begin click track practice. Use weeks three and four to prepare files, brief your engineer, and handle instrument maintenance. Musicians who start the week before almost always wish they'd started earlier.
Do I need a full demo before going to the studio?
You don't need a polished demo - you need a clear one. A rough recording that captures the structure, chords, melody, and feel of your song gives your engineer a working reference and dramatically reduces time spent explaining your vision in the session. Record it on your phone if necessary.
What is a click track and do I really need to use one?
A click track is a metronome signal (usually a simple clicking sound) fed through your headphones during recording to keep your timing locked to a fixed BPM. Almost every professional studio session uses one. It enables precise editing, clean overdubs, and consistent timing across takes. Practise with one before you arrive - playing to a click for the first time in a paid session is a costly mistake.
How do I know if my song arrangement is finalised?
Your arrangement is ready when you can play the song from start to finish without pausing to decide what comes next - and when every band member (if applicable) agrees on the structure, bar counts, and ending. If there is any uncertainty about any section, resolve it in rehearsal before you book.
What files should I send to the studio before my session?
Send your home demo (WAV or MP3), a click track at your locked BPM (44.1 kHz / 24-bit WAV), any backing tracks (WAV), your chord chart (PDF), reference track links or files, and a brief session notes document. Send everything at least 48 hours in advance.
Can I practise my song in a rehearsal studio before going to a recording studio?
Yes - and I'd strongly recommend it. A rehearsal studio gives you a full-volume, full-kit environment to run through your song with a click track before the recording session. Rates are typically much lower than recording studio rates, so an hour in a rehearsal room to tighten your parts is excellent value. Music Studio Finder lists both recording and rehearsal studios across the UK, so you can find both options in one place.
What should I do the night before a recording session?
Avoid alcohol, dairy, and anything that disrupts sleep or vocal health. Eat a nutritious dinner early. Drink 2-3 litres of water throughout the day. Get at least 7-8 hours of sleep. If you can avoid speaking loudly or in noisy environments, do so. The night before is preparation time, not performance time.
How do I write a chord chart if I can't read music?
Use chord names (G, C, Em, D) alongside your section labels and bar counts. You do not need music notation. Write the section name (e.g., "VERSE 1"), the number of bars, the BPM and time signature, and then the chord sequence bar by bar. That is a complete, usable chord chart. Any professional session musician can work from it.
What is a reference track and how do I use one?
A reference track is a commercially released song you share with your engineer to communicate the sonic direction you want. Choose two or three tracks - one for overall feel, one for mix reference, one for vocal approach. Write a short note explaining what specifically you like about each one and what, if anything, you'd want done differently on your own recording.
What happens if I arrive at the studio unprepared?
You pay for it. Undecided arrangements, shaky parts, and forgotten lyrics all cost real session time - and in a professional recording studio, session time costs real money. Beyond the financial impact, arriving unprepared puts strain on your relationship with your engineer, affects the quality of your performances, and often results in a session that doesn't achieve what you booked it for. The fix is simple: use this guide.
Ready to Book? Find Your Studio on Music Studio Finder
Once you've worked through every step above, you're ready to book. Music Studio Finder is the UK's dedicated platform for finding and comparing professional recording studios - search by location, budget, and studio type to find the right fit for your session.
If you're still in the planning phase, the how to choose a recording studio guide walks you through every factor worth considering before you commit. And if this is your first time, the first recording studio session preparation guide is written specifically for musicians navigating the booking process for the first time.
Preparation is the work. The studio is where you get to enjoy it.